With NestJs you build NodeJS server-side applications, with direct support for Express (default) or Fastify under the hood, but NestJS can work with any Node HTTP framework once an adapter is created. Nest provides an out-of-the-box application architecture which comes along with a certain level of abstraction but NestJs also exposes the underlying APIs directly to the developer. Nest is compatible with both TypeScript and pure JavaScript. NestJs makes heavy use of decorators.
Initializing a NestJS project
The following commands will create a NestJs project folder with some core files:
$ npm i -g @nestjs/cli
$ nest new project-name --strict
The bootstrapping happens in main.ts:
import { NestFactory } from '@nestjs/core';
import { AppModule } from './app.module';

async function bootstrap() {
  const app = await NestFactory.create(AppModule);
  await app.listen(3000);
}
bootstrap();
For development start
npm run start:dev
For production start
$ npm run start
NestJS request lifecycle
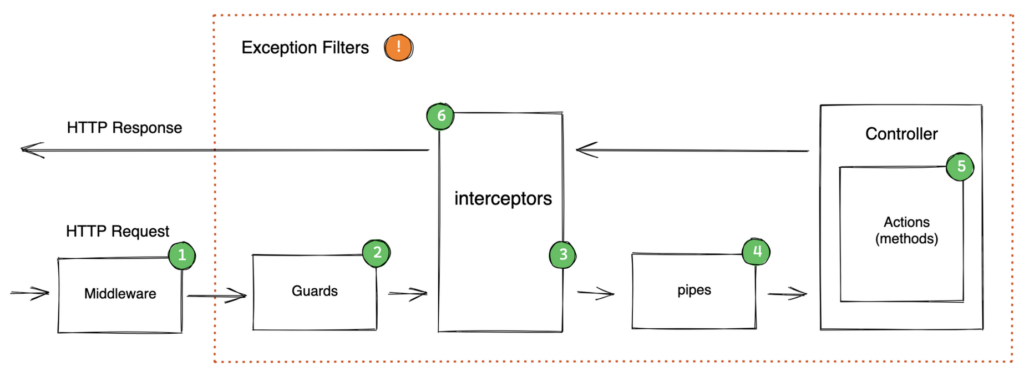
- Use middleware to inspect or change incoming requests and outgoing responses
- Use guards to determine whether a given request will be handled by the route handler or not
- Use interceptors to transform the result returned from a function, add extra logic, extend or overwrite basic behavior depending on specific conditions (e.g., for caching)
- Use pipes to transform or validate input data
- Use controllers and their actions for route handling. In GraphQL resolvers play the role of controllers.
- Exception filters catch and handle any exceptions which are not handled by your application code
Controllers
Controllers handle incoming requests and return responses. Each controller usually has more than one route which perform different actions.
For quickly creating a CRUD controller with the validation built-in, you may use the CLI’s CRUD generator: nest g resource [name].
import { Controller, Get } from '@nestjs/common';

@Controller('cats')
export class CatsController {
  @Get()
  findAll(): string {
    return 'This action returns all cats';
  }
}
@Controller('cats') together with @Get() will make this GET route available under GET /cats. If we additionally specified @Get('profile') the route would also accept requests to GET /cats/profile.
Two approaches of handling responses
In the example above, findAll() is an arbitrary name for the route handler which will return the string with a 200 OK, for POST requests it would be 201. You can adjust this by decorating the handler with @HttpCode(...). If we returned an object or array instead, NestJs would automatically serialize them to JSON.
So far, this is the standard and recommended way of handling responses. Alternatively, you can use the library-specific option if you want to access the Express response object instead:
findAll(@Res() response) {
  response.status(200).send();
}
To use both approaches at the same time (for example, by injecting the response object to only set cookies/headers but still leave the rest to the framework), you must set the passthrough option to true in the @Res({ passthrough: true }) decorator.
Providers
Providers are simply classes annotated with @Injectable() that serve the purpose of services, repositories, factories, helpers and so on. You create providers to separate the responsibility of your code according to the SOLID principles. The main idea of a provider is that it can be injected as a dependency. This allows you to create various relationships between objects in NestJs.
A class becomes a Provider if
- it got decorated with
@Injectable()and - it got declared as a provider in a module.
Creating a Provider that acts as a service
You can generate a service with nest g service cats.
import { Injectable } from '@nestjs/common';
import { Cat } from './interfaces/cat.interface';

@Injectable()
export class CatsService {
  private readonly cats: Cat[] = [];

  create(cat: Cat) {
    this.cats.push(cat);
  }

  findAll(): Cat[] {
    return this.cats;
  }
}
Injecting the provider into the controller can be simply achieved by referencing it in the constructor:
import { Controller, Get, Post, Body } from '@nestjs/common';
import { CreateCatDto } from './dto/create-cat.dto';
import { CatsService } from './cats.service';
import { Cat } from './interfaces/cat.interface';

@Controller('cats')
export class CatsController {
  constructor(private catsService: CatsService) {}

  @Post()
  async create(@Body() createCatDto: CreateCatDto) {
    this.catsService.create(createCatDto);
  }

  @Get()
  async findAll(): Promise<Cat[]> {
    return this.catsService.findAll();
  }
}
Make a provider globally available
Sometimes you just want to use a provider without having it to manually import it into the module that you want to use the provider in. To achieve this you have to create a global module (see Global modules below).
Lifetime of a provider
A provider usually is instantiated when the application is bootstrapped and destroyed when the application is shut down. However, there are ways to make your provider live only as long as one request takes.
Modules
Creating the relationship between all your classes does not happen magically. You have to define the relationships (or dependency/application graph) explicitly, using modules. A module is a class annotated with @Module() and can be generated with nest g module cats.
import { Module } from '@nestjs/common';
import { CatsController } from './cats.controller';
import { CatsService } from './cats.service';
import { CommonModule} from '../common/common.module';

@Module({
  controllers: [CatsController],
  providers: [CatsService],
  exports: [CatsService],
  imports: [CommonModule]
})
export class CatsModule {}
Within a module you can
- specify your
controllers - specify
providersthat shall be available for injection - specify which providers the module
exports - specify which modules this module
imports
controllers or providers is telling Nest “please instantiate those classes whenever this module is used”.Root module
Each application has at least one module, a root module, which by default is AppModule located under app/app.module.ts used by main.ts when you bootstrap your application via
const app = await NestFactory.create(AppModule);
The root module is the starting point Nest uses to build the application graph which is the internal data structure that Nest uses to resolve module and provider relationships and dependencies.
Feature module
Any other module is a Feature module which can be imported by another module.
As an example, when you write a CatController that injects a CatService (a Provider) you create a close relationship between them. But how does the Controller know where to inject the Provider from? After all, we do not import() or require() CatService in CatController. Instead we tell Nest to inject it, not import it. To make this injection work we have to declare any Provider that we want to use into a Module like this:
Since we did not declare DogService (let’s assume that class exists) in the providers array, we would not be able to inject DogService into CatsController for example.
We can now import the feature module into the root module (or any other module):
import { Module } from '@nestjs/common';
import { CatsModule } from './cats/cats.module';

@Module({
  imports: [CatsModule],
})
export class AppModule {}
Sharing of modules
In Nest, modules are singletons by default, and thus you can share the same instance of any provider between multiple modules effortlessly. Every module is automatically a shared module. Simply export the CatsService provider using the modules exports array. Now any module that imports the CatsModule has access to the CatsService and will share the same instance with all other modules that import it as well.
Global Modules
Making modules globally available is not a good practice if you overdo it, but in certain situations it makes sense. For example if you have a DatabaseProvider or AuthProvider that you do not want to import manually every time, then just add @Global() to your module class and import that module only once to your app.module.ts:
import { Module, Global } from '@nestjs/common';
import { CatsController } from './cats.controller';
import { CatsService } from './cats.service';

@Global()
@Module({
  controllers: [CatsController],
  providers: [CatsService],
  exports: [CatsService],
})
export class CatsModule {}
In the above example, the CatsService provider will be available everywhere, and modules that wish to inject the service will not need to import the CatsModule in their imports array.
Middleware
Use middleware to inspect or make changes to the request and the response objects.
Class based middleware
Use this approach if your middleware needs dependencies via the constructor.
import { Injectable, NestMiddleware } from '@nestjs/common';
import { Request, Response, NextFunction } from 'express';

@Injectable()
export class LoggerMiddleware implements NestMiddleware {
  use(req: Request, res: Response, next: NextFunction) {
    console.log('Request...');
    next();
  }
}
Function based middleware
Consider using this simpler approach any time your middleware doesn’t need any dependencies.
import { Request, Response, NextFunction } from 'express';

export function logger(req: Request, res: Response, next: NextFunction) {
  console.log(`Request...`);
  next();
};
Middleware is set up using the configure() method (can also be async) of the module class. Modules that include middleware have to implement the NestModule interface. Middleware can also be applied to specific routes only (forRoutes('cats')) or even specific request methods forRoutes({path: 'ab*cd', method: RequestMethod.GET}) with wildcard support. apply() method takes a single or multiple middlewares with apply(cors(), helmet(), logger).
import { Module, NestModule, MiddlewareConsumer } from '@nestjs/common';
import { LoggerMiddleware } from './common/middleware/logger.middleware';
import { CatsModule } from './cats/cats.module';

@Module({
  imports: [CatsModule],
})
export class AppModule implements NestModule {
  configure(consumer: MiddlewareConsumer) {
    consumer
      .apply(LoggerMiddleware)
      .forRoutes('cats');
  }
}
Noticed that consumer? The MiddlewareConsumer is a helper class to allow chaining.
You can also exclude routes.
Global middleware
If we want to bind middleware to every registered route at once, we can use the use() method that is supplied by the INestApplication instance:
const app = await NestFactory.create(AppModule);
app.use(logger);
await app.listen(3000);
Exception filters
When an exception is not handled by your application code, it is caught by this layer using a global exception filter which handles exceptions of type HttpException (@nestjs/common) and automatically sends an appropriate user-friendly response. Exceptions of any other type generate this:
{
  "statusCode": 500,
  "message": "Internal server error"
}
Throwing standard exceptions
Using a string like ‘Forbidden’ as first parameter will use that string in the resulting message.
@Get()
async findAll() {
  throw new HttpException('Forbidden', HttpStatus.FORBIDDEN);
}
results in
{
  "statusCode": 403,
  "message": "Forbidden"
}
Overwriting error JSON response body
You can use an object instead to completely overwrite the entire JSON response body. There is a third constructor argument (optional) – options – that can be used to provide an error cause. This cause object is not serialized into the response object, but it can be useful for logging purposes, providing valuable information about the inner error that caused the HttpException to be thrown.
@Get()
async findAll() {
  try {
    await this.service.findAll()
  } catch (error) {
    throw new HttpException({
    status: HttpStatus.FORBIDDEN,
    error: 'This is a custom message',
  }, HttpStatus.FORBIDDEN, {
    cause: error
  });
  }
}
results in
{
  "status": 403,
  "error": "This is a custom message"
}
Custom exceptions
In many cases, you will not need to write custom exceptions, but if you do you can simply extend HttpException.
export class ForbiddenException extends HttpException {
  constructor() {
    super('Forbidden', HttpStatus.FORBIDDEN);
  }
}
Since ForbiddenException extends the base HttpException, it will work seamlessly with the built-in exception handler, and therefore we can use it inside the findAll() method.
@Get()
async findAll() {
  throw new ForbiddenException();
}
You can see a list of all built-in exception classes on this NestJS docs page.
Custom Exception filter
You may want full control over the exceptions layer, instead of using the built-in on. For example, you may want to add logging or use a different JSON schema based on some dynamic factors.
In the following example we only @Catch(HttpException) but could also use a comma-separated list. This lets you set up the filter for several types of exceptions at once.
All exception filters should implement the generic ExceptionFilter<T> interface
import { ExceptionFilter, Catch, ArgumentsHost, HttpException } from '@nestjs/common';
import { Request, Response } from 'express';

@Catch(HttpException)
export class HttpExceptionFilter implements ExceptionFilter {
  catch(exception: HttpException, host: ArgumentsHost) {
    const ctx = host.switchToHttp();
    const response = ctx.getResponse<Response>();
    const request = ctx.getRequest<Request>();
    const status = exception.getStatus();

    response
      .status(status)
      .json({
        statusCode: status,
        timestamp: new Date().toISOString(),
        path: request.url,
      });
  }
}
Pipes
Use pipes for transformation and validation of route parameters such as @Param('id'), @Body() or @Query('id').
A pipe is invoked before the method of a controller route handler is called and receives the arguments before they are forwarded to the controller.
Any exception a pipe throws is handled by the exceptions layer and no controller method is subsequently executed.
Built-in pipes
ValidationPipeParseIntPipeParseFloatPipeParseBoolPipeParseArrayPipeParseUUIDPipeParseEnumPipeDefaultValuePipeParseFilePipe
Validation vs. Transformation
Parsing a value is a transformation but can also be regarded as a validation at the same time, because if a string value of “abc” cannot be parsed to an integer, an exception is thrown and the parsing/transformation/validation failed. Strictly speaking, a validation pipe either returns the value unchanged, or throws an exception, whereas a transformation pipe returns a value that is different from the incoming value.
Using pipes
Using a pipe is also referred to as bind an instance of the pipe to the appropriate context. Here, we simply pass in the class ParseIntPipe in the @Param:
@Get(':id')
async findOne(@Param('id', ParseIntPipe) id: number) {
  return this.catsService.findOne(id);
}
Now, because of the pipe we can be sure that id is an integer, otherwise an exception would have been thrown earlier, such as this one if we call the route GET localhost:3000/abc which uses a string ‘abc‘:
{
  "statusCode": 400,
  "message": "Validation failed (numeric string is expected)",
  "error": "Bad Request"
}
Instead of using just the class name we can alternatively pass an instance like that:
@Get(':id')
async findOne(
  @Param('id', new ParseIntPipe({ errorHttpStatusCode: HttpStatus.NOT_ACCEPTABLE }))
  id: number,
) {
  return this.catsService.findOne(id);
}
Example of parsing a query value to an integer
@Get()
async findOne(@Query('id', ParseIntPipe) id: number) {
  return this.catsService.findOne(id);
}
Example of parsing a route parameter to a UUID
@Get(':uuid')
async findOne(@Param('uuid', new ParseUUIDPipe()) uuid: string) {
  return this.catsService.findOne(uuid);
}
Building a custom pipe
Make a class @Injectable() and implement PipeTransform‘s transform method :
import { PipeTransform, Injectable, ArgumentMetadata } from '@nestjs/common';

@Injectable()
export class ValidationPipe implements PipeTransform {
  transform(value: any, metadata: ArgumentMetadata) {
    return value;
  }
}
ArgumentMetadata is an object containing this:
export interface ArgumentMetadata {
  type: 'body' | 'query' | 'param' | 'custom';
  metatype?: Type<unknown>;
  data?: string;
}
Example of a schema-based validation using a custom pipe
Let’s say we have the following controller
@Post()
async create(@Body() createCatDto: CreateCatDto) {
  this.catsService.create(createCatDto);
}
and we want to validate that the incoming @Body() values really are of the types as defined in CreateCatDto.
export class CreateCatDto {
  name: string;
  age: number;
  breed: string;
}
One common approach is to use schema-based validation: You define a schema of the data that you expect to receive and compare if the incoming data actually matches the schema. The Joi library allows you to create schemas in a straightforward way. Let’s install it with yarn add joi. Next, we create a specific pipe that must be instantiated with a joi schema and which handles the validation in its transform method:
import { PipeTransform, Injectable, ArgumentMetadata, BadRequestException } from '@nestjs/common';
import { ObjectSchema } from 'joi';

@Injectable()
export class JoiValidationPipe implements PipeTransform {
  constructor(private schema: ObjectSchema) {}

  transform(value: any, metadata: ArgumentMetadata) {
    const { error } = this.schema.validate(value);
    if (error) {
      throw new BadRequestException('Validation failed');
    }
    return value;
  }
}
Here is how we use the pipe
@Post()
@UsePipes(new JoiValidationPipe(createCatSchema))
async create(@Body() createCatDto: CreateCatDto) {
  this.catsService.create(createCatDto);
}
Example of a class/decorator-based validation using a custom pipe
The class-validator library allows you to use decorator-based validation which makes the class that you use the decorators on the single source of truth for validation.
yarn add class-validator class-transformer
import { IsString, IsInt } from 'class-validator';

export class CreateCatDto {
  @IsString()
  name: string;

  @IsInt()
  age: number;

  @IsString()
  breed: string;
}
Now the question is how do we connect our dto, we use a validation pipe.
ValidationPipe is provided by Nest out-of-the-box. The built-in ValidationPipe offers more options than the following example. Also note that we implement PipeTransform also for validation since there is no PipeValidation.import { PipeTransform, Injectable, ArgumentMetadata, BadRequestException } from '@nestjs/common';
import { validate } from 'class-validator';
import { plainToInstance } from 'class-transformer';
@Injectable()
export class ValidationPipe implements PipeTransform<any> {
async transform(value: any, { metatype }: ArgumentMetadata) {
if (!metatype || !this.toValidate(metatype)) {
return value;
}
const object = plainToInstance(metatype, value);
const errors = await validate(object);
if (errors.length > 0) {
throw new BadRequestException('Validation failed');
}
return value;
}
private toValidate(metatype: Function): boolean {
const types: Function[] = [String, Boolean, Number, Array, Object];
return !types.includes(metatype);
}
}
Then in a controller
@Post()
async create(
  @Body(new ValidationPipe()) createCatDto: CreateCatDto,
) {
  this.catsService.create(createCatDto);
}
Global scoped pipes
async function bootstrap() {
  const app = await NestFactory.create(AppModule);
  app.useGlobalPipes(new ValidationPipe());
  await app.listen(3000);
}
bootstrap();
or if you need to inject a service into the pipe (which is not possible with global pipes) you can do:
import { Module } from '@nestjs/common';
import { APP_PIPE } from '@nestjs/core';

@Module({
  providers: [
    {
      provide: APP_PIPE,
      useClass: ValidationPipe,
    },
  ],
})
export class AppModule {}
Default values for pipes
Parse* pipes expect a parameter’s value to be defined. They throw an exception upon receiving null or undefined values. To allow an endpoint to handle missing querystring parameter values
@Get()
async findAll(
  @Query('activeOnly', new DefaultValuePipe(false), ParseBoolPipe) activeOnly: boolean,
  @Query('page', new DefaultValuePipe(0), ParseIntPipe) page: number,
) {
  return this.catsService.findAll({ activeOnly, page });
}
Should you create two types of dtos? One for a controller and one for the service layer?
It’s a common practice to have separate Data Transfer Objects (DTOs) for the controller layer and the service layer in a NestJS application. This approach allows you to decouple the two layers and make changes to one without affecting the other.
For example, you might have a CreateUserDto for the controller layer that includes validation rules for creating a new user. This DTO would be used to validate the incoming request data and ensure that it meets the requirements for creating a new user.
You could then have a separate CreateUserInput DTO for the service layer that represents the data needed to create a new user in your database. This DTO would be used by your service to interact with your database and create a new user record.
By having separate DTOs for each layer, you can change the validation rules or database schema without affecting the other layer. This makes it easier to maintain and evolve your application over time.
That being said, whether or not you should use separate DTOs depends on your specific use case and requirements. If having separate DTOs adds unnecessary complexity to your application, you might choose to use a single DTO for both layers.
Guards
Guards determine whether a given request will be handled by the route handler or not. Guards have access to the ExecutionContext instance, and thus know exactly what’s going to be executed next, which makes them a better use case for authentication than using middleware.
Every guard must implement a canActivate() function. This function should return a boolean, indicating whether the current request is allowed or not. It can return the response either synchronously or asynchronously (via a Promise or Observable).
import { Injectable, CanActivate, ExecutionContext } from '@nestjs/common';
import { Observable } from 'rxjs';

@Injectable()
export class AuthGuard implements CanActivate {
  canActivate(
    context: ExecutionContext,
  ): boolean | Promise<boolean> | Observable<boolean> {
    return false;
  }
}
In the example above we decline every request and receive
{
  "statusCode": 403,
  "message": "Forbidden resource",
  "error": "Forbidden"
}
About Author

I am Mathias from Heidelberg, Germany. I am a passionate IT freelancer with 15+ years experience in programming, especially in developing web based applications for companies that range from small startups to the big players out there. I create Bosycom and initiated several software projects.