An image actually consists of many images, aka image layers. The main reasons being that those can be cached and thus don’t have to be rebuild every time you create an image.
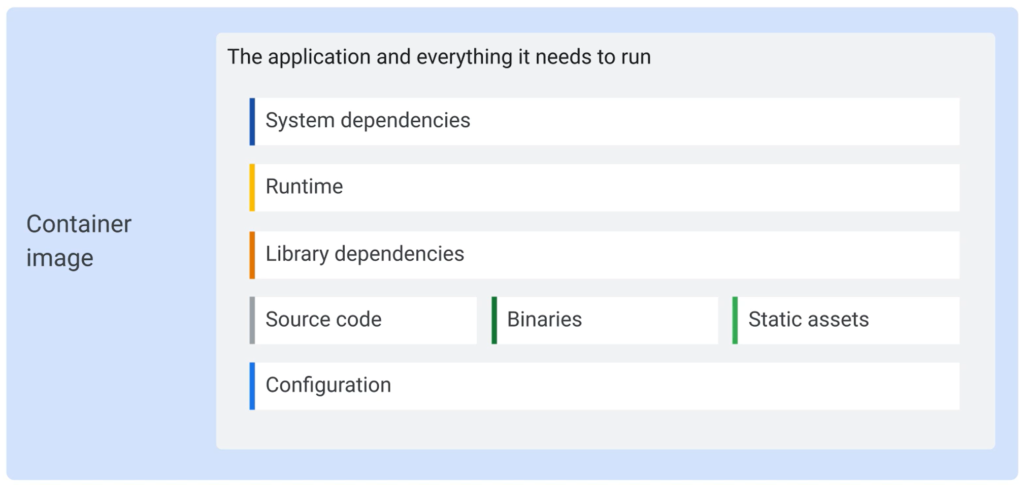
System dependencies such as tar, curl or maybe ImageMagick etc.
Runtime such as NodeJS, Java, Python etc.
Configuration can be things like
- Entrypoint “node server.js”
- Environment variables
- User
- Working directory
Here are some image commands:
docker image COMMAND

Commands:
  ls          List images
  build       Build an image from a Dockerfile
  rm          Remove one or more images
  prune       Remove unused images
  tag         Create a tag TARGET_IMAGE that refers to SOURCE_IMAGE

  pull        Pull an image or a repository from a registry
  push        Push an image or a repository to a registry

  history     Show the history of an image
  import      Import the contents from a tarball to create a filesystem image
  inspect     Display detailed information on one or more images
  load        Load an image from a tar archive or STDIN
  save        Save one or more images to a tar archive (streamed to STDOUT by default)
Building an image from a Dockerfile and tagging it
A Dockerfile is a specific script file that lets you build a container image. Name it Dockerfile without a file extension and locate it in the same folder as package.json.
The following example of a Dockerfile uses an alpine version of Node as a base image, setting the working directory of the app, copies source code from the current folder into the image, defines the start script and installs production dependencies.
FROM node:12-alpine
WORKDIR /app
COPY . .
ENTRYPOINT ["node", "server.js"]
RUN npm install --production
Setting up a Dockerfile usually involves those steps:
- Install system dependencies
- Install runtime
- Download library dependencies
- Compile binaries
- Package files into the container image
- Set container configuration
You eventually build an image from the Dockerfile like this:
docker build -t getting-started .
// or
docker image build -t getting-started .
Here we tag (-t) the image to specify a human readable name to refer to it more easily when running a container from it later on.
By the way, we would use the same command again if we wanted to create an updated version of the image.
The dot at the end specifies the location of the local Dockerfile (aka build context) but it can also be a git repository url.
Now, this happens in the background when building an image: Docker sends your files (the build context) to the docker daemon and ignores any files and folders specified in a .dockerignore file. Then Docker processes each line in the Dockerfile: For each line Docker
- creates an intermediate container
- executes the argument you specified
- creates an image (only if the container has data) and adds it as a layer
- finally deletes the intermediate container
Multi Stage Builds
You must avoid to run large docker containers that have tools installed that are only relevant for development or the build process of the app. Instead you need to build an Image that only contains the necessary tools and files that are essential for the production environment. Multi-stage builds help us reduce overall image size and increase security of the final container by separating build-time dependencies from runtime dependencies.
You can easily spot multi-stage builds within a Dockerfile by their multiple use of the FROM ... AS and COPY --from=mystage /foo /bar.
React example
The following example first builds an image labeled “development” and then a second image “production” that copies files from “development”:
FROM node:14 AS development
WORKDIR /usr/src/app
COPY package*.json ./
RUN npm install
COPY . .
# enable/disable testing
#RUN CI=true npm test
RUN npm run build

FROM nginx AS production
COPY --from=development /usr/src/app/build /usr/share/nginx/html
COPY --from=development /usr/src/app/nginx.conf /etc/nginx/conf.d/default.conf

# Fire up nginx
EXPOSE 80
CMD ["nginx", "-g", "daemon off;"]
To only build a specific stage (in this example development) you have to specify the target stage:
docker build -t front-end:dev --target development .
Sharing an image on a registry
To share Docker images, you use a Docker registry and create a repo there. The default registry is Docker Hub (needs an account) which we use in the following command together with a repo name of getting-started:
docker push docker/getting-started
Tagging an image for a registry
docker login -u YOUR-USER-NAME
docker tag getting-started YOUR-USER-NAME/getting-started
Then try to push using your user name:
docker push YOUR-USER-NAME/getting-started
Removing images
# Remove specific image
docker rmi <image-id>

# Remove all images (You should first remove all containers)
docker rmi -f $(docker images -a -q)

# Remove dangling images (those intermediate images without ID)
docker rmi $(docker images -f "dangling=true" -q)
Renaming an image
docker tag OldName:tag NewName:tag
Giving an image (ID) a name
If you want to name a non-named image like
<none> <none> 1d75add374d7 3 minutes ago 134MB
then you achieve this by tagging it:
docker tag 1d75 myrepo:my-image-name
Display layers of a Docker image
See the command that was used to create each layer within an image:
docker image history getting-started
You’ll notice that several of the lines are truncated. If you add the --no-trunc flag, you’ll get the full output.
Layers are cache but once a layer changes, all downstream layers have to be recreated as well. That means the order of the lines in Dockerfile matter.
The following is bad because when we make a change to the image, the yarn dependencies have to be reinstalled:
FROM node:12-alpine
WORKDIR /app
COPY . .
RUN yarn install --production
CMD ["node", "src/index.js"]
To fix this, we need to restructure our Dockerfile. For Node-based applications, those dependencies are defined in the package.json file. So, what if we copied only that file in first, install the dependencies, and then copy in everything else? Then, we only recreate the yarn dependencies if there was a change to the package.json.
 FROM node:12-alpine
 WORKDIR /app
 COPY package.json yarn.lock ./
 RUN yarn install --production
 COPY . .
 CMD ["node", "src/index.js"]
Ignore files for docker container
Add a .dockerignore file and add folders that should be ignored when copying over files to the container.
About Author

I am Mathias from Heidelberg, Germany. I am a passionate IT freelancer with 15+ years experience in programming, especially in developing web based applications for companies that range from small startups to the big players out there. I create Bosycom and initiated several software projects.