Terms and concept
Most IDEs let you manage git visually so that you do not have to enter any git commands manually. So why learn Git commands at all? Because they give you advanced control over git and if you understand git commands then you will understand what your IDE is actually doing under the hood.
Basic workflow
You either create your own local Git repository via git init or get your own local copy of an existing remote Git repository via git clone https://myrepo.git. In both cases you end up with a local Working area in which you modify files within a branch which is called main by default (formerly master). Each team member that clones a repository gets their own local copy, completely independent from yours.
Your modifications are untracked unless you git add . all untracked files to your Index / Staging Area. Staged files are tracked and can be committed together via git commit -m "my message" to your local Git repository. Committing a file is like creating a snapshot of the file: You can make further changes and always get back to an earlier state.
Finally you can git push one or more commits to a branch in a remote Git repository. git fetch will retrieve any commits from the remote branch that do not exist in your current branch and store them in your local repository.
Four Areas
Git is working with files in four areas:
- Working Area contains files and folders that you are currently editing
- Index (also sometimes called Staging Area) is actually a binary file located in
.git/index. - Repository to store your work locally
- Stash, a clipboard to store temporary changes
With each git command you have to ask yourself two questions:
- How does this command move information across the Four Areas?
- How does this command change the Repository?
Git objects
Your local git repository is just a folder called .git within your project which is either created by yourself with git init or via git clone from an existing remote repository. One of its subfolders is objects which stores immutable information. The history of files are stored as blobs, directories as trees and commits. Those are all linked together to form your project’s history.
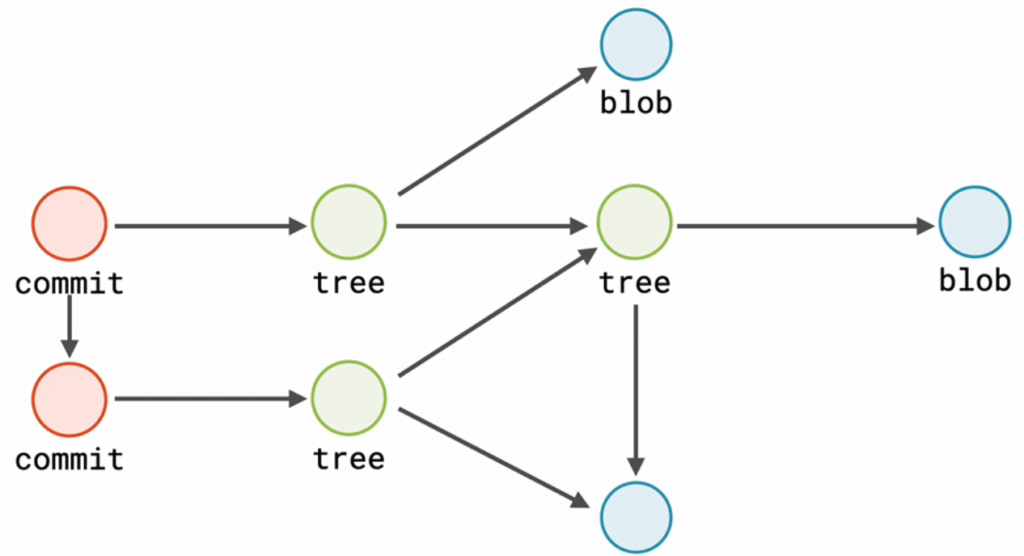
Each commit is like a snapshot that points to a historic state of your project. Of course, not every “snapshot” has a full copy of the changed files and folders, instead blobs and trees are shared between commits.
Each commit is pointing to its parent commit, which itself is pointing to its parent commit and so forth. A branch is just a reference to a commit. There can be multiple branches and commits can be shared between branches. There is a special unique branch called HEAD which always references to the current branch.
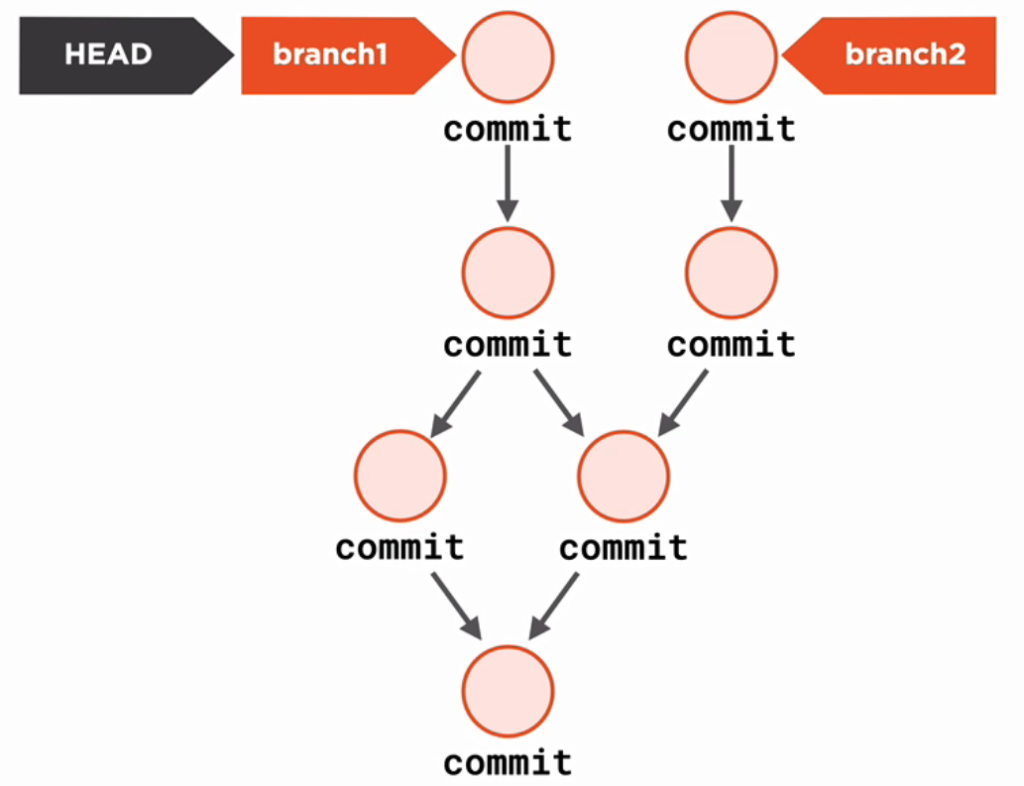
Deleting branch2 is equal to deleting the reference to the commit, which leaves some commits unreachable. In this case git will automatically garbage collect orphaned commits.
git rm myFile.txt removes the file from working area and index. To only remove it from index run git rm myFile.txt --cached. Keep in mind that this does not only unstage the file, it also deletes the file from index, which means if you commit this then you will also remove the file from the repository.
You might want to rename a file via mv myFile.txt myFile.md. To git this looks like myFile.txt was deleted and myFile.md was newly created. But if you git add . both files and then do git status you will see that git is smart enough to automatically figure out that the file has actually just been renamed.
Git log
See the history of the current branch with git log --oneline or from another branch with git log anotherBranch --oneline. For a better visualization choose git log --graph --decorate --oneline. View the content of a single commit with git show <commit>. The current commit with git show HEAD and the parent of any commit by adding ^, e.g. git show HEAD^. This even works with parent of parent like git show HEAD^^ or a specified number of commits: git show HEAD~5 goes back 5 parents from HEAD. In case of a merge-commit there are two parents, so this is how you go back 5 parents to the merge commit and choose to log the second parent: git show HEAD~5^2. git show HEAD@{"1 month ago"} does exactly what you would expect.
git blame file.txt shows the commit, date and author of each line in the file.
git log –grep foo –oneline only shows commits that contain foo as commit message. To see which commits contain the content “foo” (not content of commit message, but real changed content) use git log -Gfoo. Add --patch to this command to see only the affected lines.
To show a range of commits you use git show -5 --oneline or git show HEAD~5..HEAD --oneline (old..new but displayed with oldest at bottom). git log mybranch..master --oneline will show all the commits that exist in master but not in mybranch.
All your git actions such as checkout, commit, rebase and reset are logged in your local repository and can be displayed with git reflog HEAD. This allows you to get the hash of commits that would otherwise be unreachable, for example after your rebased.
Git Stash
Let’s assume you are in the middle of developing a feature, your changes are not ready for commit yet and then you have to switch to another branch to hotfix a bug for example. In this case you git stash --include-untracked your changes into one single stash object. First, this command copies all the changes from working area and index that are not in the commit to the stash area. Then it checks out the current commit (which is copying files to working area and index) to align them with the repository. You can read the stash content with git stash list. To copy the stashed changes back you run git stash apply. You can git stash clear the entire stash.
Committing partial changes
A file is not the smallest part that can be committed with git. Instead you can commit separate changes within a file (called hunks) independently. You start this with git add --patch file.txt. Now git displays one of possible many hunks and asks you how to proceed with it. For example, you can press n to skip the displayed hunk for commit or y to include it or s to even split it up into smaller hunks.
Fixing mistakes in git’s history
Changing the latest commit
Let’s assume you committed fileA.txt only to find out that you forgot to add fileB.txt to make that commit work. Of course you could just create an additional commit fileB.txt on top of fileA.txt, but then there would still exist an unstable commit fileA.txt in your history. It is better to git commit --amend. This will take the previous fileA.txt commit and create a new commit that contains both fileA.txt and fileB.txt. Git will also switch to that new commit making the old fileA.txt commit obsolete and ready for garbage collection.
Rewriting large chunks of history
Imagine you accidentally committed a big test file over several commits and find out only later. git filter-repo --path file.txt --invert-paths will remove file.txt from all commits in your history.
Revert commit
There are a couple of ways to revert a commit, for example you can start an interactive rebase. But because that will change history by creating probably many new commits that is only recommended if you change non-shared commits.
Another way to revert a commit that was already published is to create a new commit that does the opposite of the commit that you want to undo with git revert <commit>. This is especially useful if a manual undo that covers hundreds of lines is too demanding. But be aware that this does not change git history and should not be done frequently to undo your changes.
Undoing a merge can be done with git reset --merge ORIG_HEAD.
More on branches
Showing
With Git it is encouraged and easy to create and switch between many branches: You can show all local branches with git branch, add -a to also show remote branches and -v to see the last commit on each branch.
Creating and switching
You create a new branch with git branch myNewBranch which does not automatically switch to it. To switch to a branch you run git checkout myNewBranch. You can create and switch a branch in one go with git checkout -b myOtherBranch. Ideally you should use short branch names that follow a naming convention like bug/123/menu-issue or feat/115/mail.
Copying a repository state to working area and index can be done with git checkout myBranch. Internally it does two things: First HEAD is moved to the specified repository branch, then the files are copied to working area and index. Newer git versions support git switch myBranch which only does the first step, which is moving HEAD to the specified repository branch. The second part, copying files from repository, can be achieved with git restore (see below).
Deleting
You delete a branch with git branch -d myBranch, but this will show an error if you have unmerged commits. To force deletion run git branch -D myBranch instead. Remember that you cannot delete a branch that you are currently working in.
If you create a branchA, then commit a file, switch back to branchB and try to delete branch A, then you will get an error The branch 'branchA' is not fully merged. This is a protection mechanism. You would have to force delete the branch or merge it first.
Renaming
Rename a branch with git branch -m oldBranch newBranch. Think of –m as moving a branch. To rename the current branch simply run git branch -m newBranch.
Reset
git reset <commit> is moving the current branch to a specific commit and then copies files (or not) to working area or index, depending on the switch. The --hard switch copies content of the repository to working area and index, overwriting possible changes on them. --mixed (default) copies to index but leaves working area alone. --soft leaves working area and index untouched.
git reset HEAD skips moving the current branch, but then proceeds as above. When you try to git reset --hard HEAD file.txt it might not work causing error fatal: Cannot do hard reset with paths. In this case you have to git checkout HEAD file.txt to copy file.txt from repository to working area and index. Newer git versions support git restore --staged file.txt to unstage a file, meaning copying from repository to index.
Merging
git merge mybranch merges mybranch into your current branch.
If you create a branch called B off of a branch A then you want to reconcile B at some point with A again. B is the source branch and A is the target branch. Merging always leaves the source branch untouched but changes the target branch.
To merge B into A run git merge A from B‘s working directory. If A has not changed when you are about to merge B then the merging is simply a fast forward.
If on the other hand A has changes in a file that you also changed in B, then Git’s automatic merge process is interrupted because you have to manually resolve merge conflicts. git status will show that you have Unmerged paths and a merging state.
Git will display the names of the conflicting files and also change their content by adding file markers such as <<<< HEAD changeA ==== changeB >>>> A as a visual aid to identify where the conflict occurred. It is your task to inspect the files and create a final result that contains changes from both branches. After you edited the files you stage them with git add and run git commit to conclude the merge.
A merge commit has two parent commits, one from A and one from B. Make sure you have the latest changes from any remotes before you start the merge. A merge commit should only combine existing content and not introduce new content, because it is hard to track where the new content came from (‘evil commit’). Instead, git merge --abort, make and commit the content change and then start the merge again.
Merging with one commit
Let’s assume we want to merge feature-branch into master, but we do not want the history to show all the commits that happened in feature-branch. Instead we want all the commits squashed together, so that the resulting merge will only have one commit with custom message. First you git merge --squash <feature branch> then you commit.
Comparing branches
git diff branch1 branch2 compares two branches.
Rebasing
Rebase is an advanced git feature that can cause a lot of problems if not used properly. Since rebase is not really necessary there are many teams and articles on websites that are recommending to never use rebase at all. The official rule is: Never use rebase on a public branch. Do not rebase after pushing to remote. Again: Ask yourself “Is any commit that is going to be rebased already shared on another public branch?” If yes, do not rebase.
The purpose of rebasing is to clean up the local git history which will increase accuracy and clarity for anyone reading the git history. You can think of it as reading a rough draft (not rebased) vs the final copy of a document (rebased). Another scenario is to use rebase to pull changes from a branch into your branch without performing a merge.
Squashing commits
Squashing commits will clean the git history because it copies the content of all commits since where you branched off (the merge-base or original base) into one single new commit.
In this example you have three commits on solution that you want to squash:
Those changes will be aggregated…
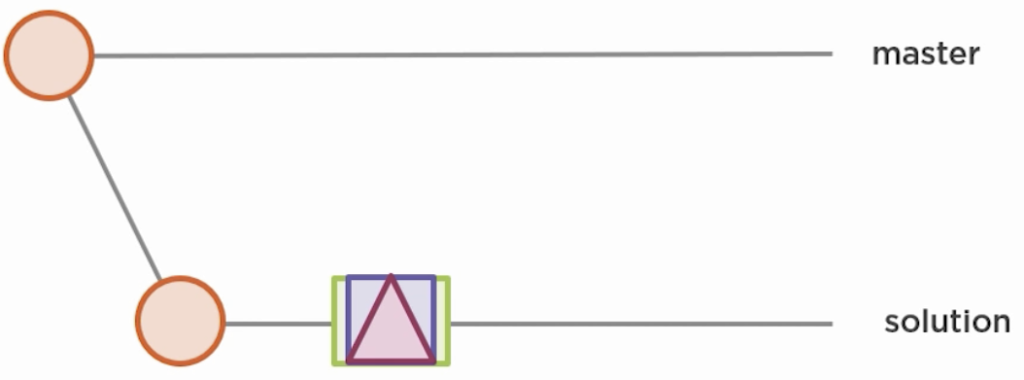
…into one new commit:
And here is how you do it:
- Start by displaying your commits via
git log --oneline. - Then get the sha of the original base of
solutionby executinggit merge-base solution master. - Start the interactive rebase from the commit sha with
git rebase -i <commit-sha> - Git will open an editable file with a list of commits to work with. Add
squashin front of each commit that you want to aggregate, for example changepick 8539e5n2 fixtosquash 8539e5n2 fix. Save the file. - Git will open another editable file containing the all commit messages. Choose the commit message that you want to use and save.
If for any reason the rebasing process is interrupted, such as when having to resolve a conflict, simpy type git rebase --continue to proceed with rebasing.
Rebase branch from Master
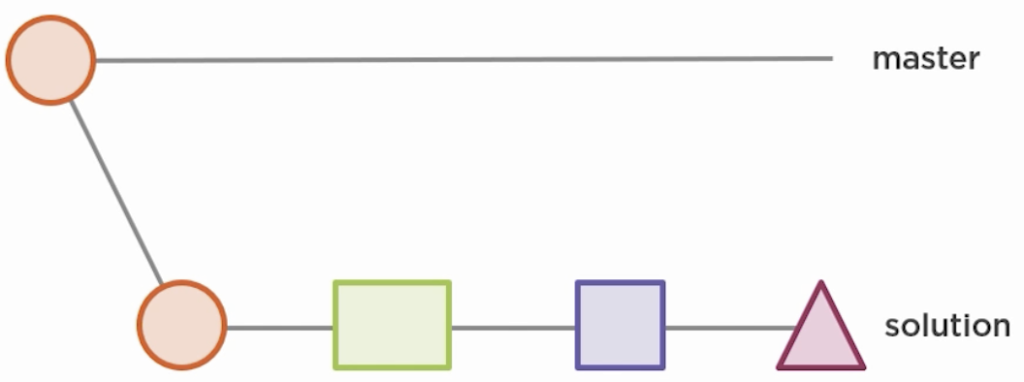
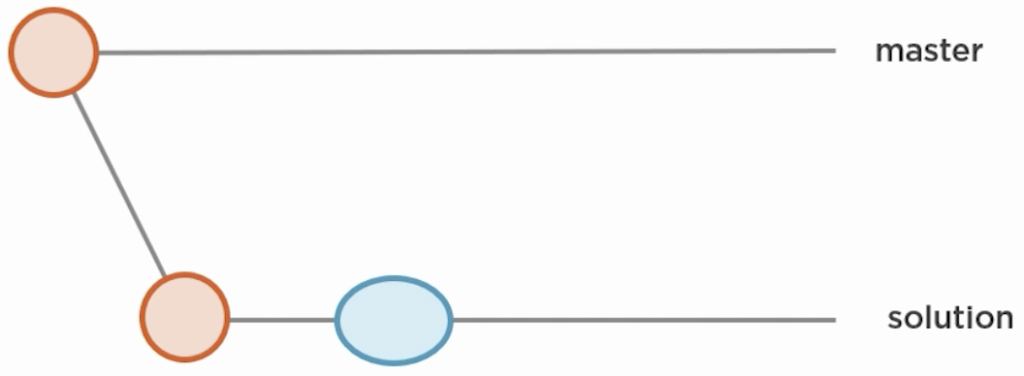
Best explained by example: You start of by creating a branch solution from master. You commit changes on solution.
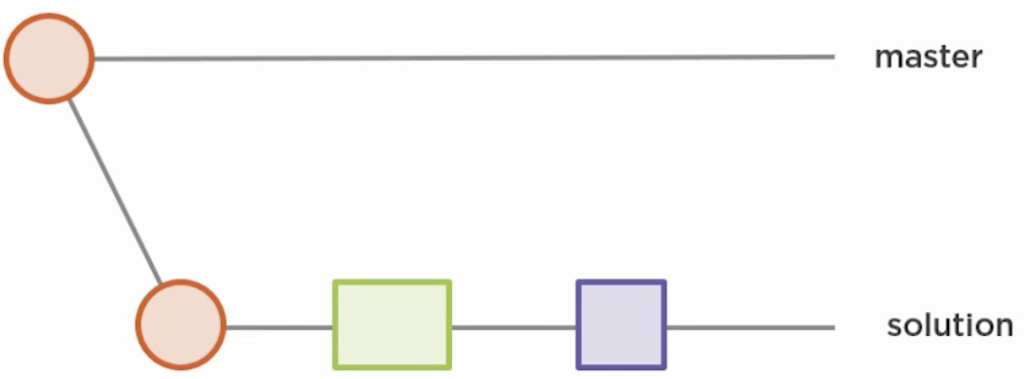
Now, when master has changes…
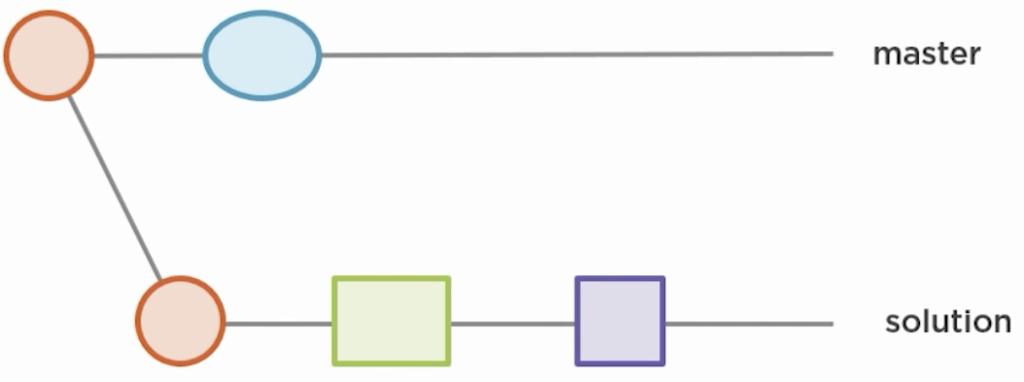
you want to rebase those changes onto solution to get a cleaner history. You already checked out solution and now run git rebase master. Rebasing executes several steps:
- Search common ancestor of
solutionandmaster. In this example the red circle. - Now take all the changes from
masterstarting from common ancestor. In this example the only change is the blue ellipsis. - Append these changes right after the common ancestor in
solution. The blue ellipsis now also appears onsolution. - Now create a copy of all existing changes from
solution(green and purple) - Commit those copied
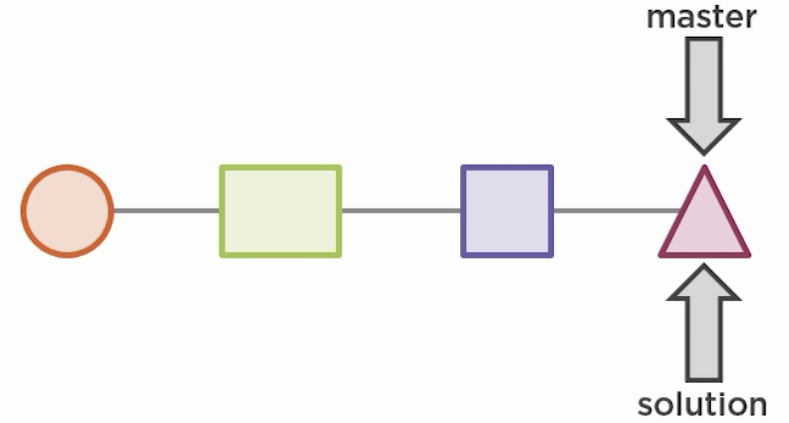
solutionchanges ontosolution. Yes, a copy if the changes gets “replayed” and the original changes are left behind as orphaned, ready to be picked up by git’s garbage collection. You will end up with this:
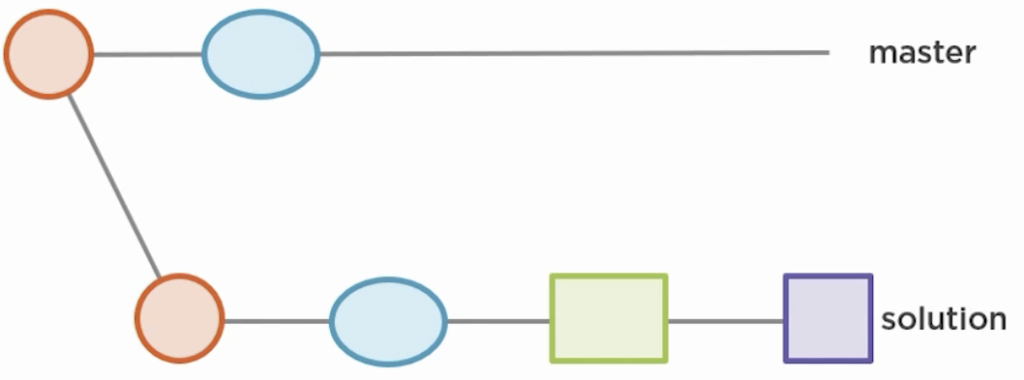
The green square has a new parent / base. That’s why it is called rebasing: Your changes on solution are replayed on a new base which was pulled onto solution from master.
Now, if you merge back to master you will get a clean history, because it is a fast forward merge.
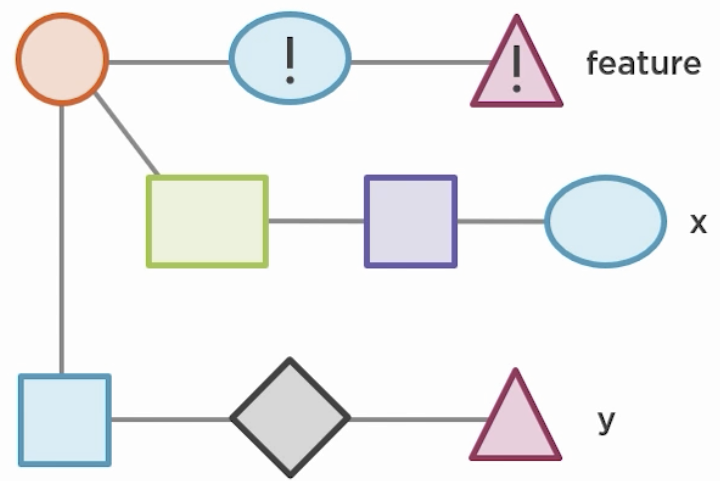
Cherry pick
git cherry-pick ec24ds24 takes one or more commits from a specified branch, makes a copy of the commit(s) and applies the copy into the current branch. The original commits stay untouched, but the new copies represent new commits.
Cherry picking is useful if you have a bugfix-commit and want to apply this fix to other branches. Another scenario is to cherry-pick useful commits from an inactive branch that is not going to be merged.
In the following example we get the sha of commit from branch x by git log x --oneline and from branch y by git log y --oneline. Now we git checkout master because that is where we want both commits applied and git cherry-pick ec24ds24, git cherry-pick ag5734gl them.
Remotes
Remotes are locations where a project is hosted, for example GitHub, Bitbucket or GitLab (but not limited to the mentioned ones). If you run git clone https://myrepos.local/project/a.git from a local folder /myprojects/ then a remote repository will be downloaded to /myprojects/a. Git will also set up a local master branch that tracks the remote origin/master branch.
Git’s default name for a remote repository is origin. You can provide a name for a remote server with git remote add <name> <remote-url>. Display a list of remotes and URLs with git remote -v.
git fetch will download any information from the tracked remote repository that is not already in your local copy. You can then analyze the info and decide what to do next. git pull is a combination of git fetch and git merge.
To provide your local changes to remote you run git push. Any conflicts must be resolved first before a push is successful. You can push your local branch to specified remote branch with git push -u origin myNewBranch. Get a list of remote branches with git ls-remote. Run git fetch origin myNewBranch to make the remote branch available locally. Listing all branches with git branch -a will show that myNewBranch exists locally now, but it does not track any remote branch. Run git checkout --track origin/myNewBranch to setup a branch in the local repository that will track the remote branch.
Diff
git diff shows the difference between working area and index. git diff --cached shows difference between index and repository, meaning it shows what would be committed via git commit. To see what has changed since last commit run git diff HEAD, in other words what would be committed if you ran git commit -a.
To see the difference between your current working directory and a specific commit run git diff <commit-sha>. To see the difference between what is staged and a commit run git diff --cached <commit-sha>. git diff <commit-sha> <commit-sha> shows the difference between two commits.
git diff feature master shows difference between the latest versions of two branches. Append file.txt to the command to only see changes of that specific file. To display what changed in master since feature was started off of it run git diff feature...master.
Pitfall: Pulling with untracked changes
| User A actions | User A working directory | User B working directory | User B actions |
|---|---|---|---|
| Has text.txt | Init content | Init content | Has text.txt |
| Edits text.txt | Init content modified by User A | ||
git add . | |||
git commit | |||
git push origin master | |||
User should run git pull origin master, but does not | |||
| Init content by User B | Edits text.txt | ||
git pull origin master -> Please commit your changes or stash them before your merge. | |||
git commit -am "User B changes" | |||
git pull | |||
| <<<< HEAD Init content modified by User B ====== Init content modified by User A >>>> 34huf2fs | Merge conflict | ||
| Init content modified by User A and User B | Resolve conflict | ||
git commit -am "Resolved merge conflict" | |||
git push origin master |
Only git pull if your working directory is clean, meaning all modifications are stashed, committed or reverted.
Remember to commit early and often. Also pull frequently from upstream.
Pitfall: Force Push
| User A actions | User A working directory | User B working directory | User B actions |
|---|---|---|---|
| Has demo1.txt | Init content | Init content | Has demo1.txt |
| Creates demo2.txt | |||
git add . | |||
git commit -m "User B added file" | |||
git push origin master | |||
| Edits demo1.txt | Init content modified by User A | ||
| git commit -m “Modified content” | |||
git push origin master –> Failed to push. Updates were rejected because the remote contains work that you do not have locally. This is usually caused by another repository pushing to the same ref. You may want to first integrate the remote changes. | |||
git push origin master --force –> will overwrite commits of User B |
Ignore files
Git files are either tracked (staged or committed), untracked or ignored. Place a .gitignore file in the root project and add patterns to specify which files or folders shall be ignored by git. Ignored files or folders will not be added to the branch and thus won’t be pushed to a remote repo. You might want to ignore files and folders that are only relevant to you locally, such as build files, IDE config files, cached files etc.
| .project | ignores filenames and directories called .project including sub directories |
| bin/ | ignores directories called bin |
| *.class | ignores files with specific extension class |
| **bin | ignores bin files in a sub directory |
About Author

I am Mathias, born 41 years ago in Heidelberg, Germany. Today I am living in Munich and Stockholm. I am a passionate IT freelancer with more than 16 years experience in programming, especially in developing web based applications for companies that range from small startups to the big players out there. I am founder of bosy.com, creator of the security service platform BosyProtect© and initiator of several other software projects.