Here is the assumed prerequisite: Your application runs in Containers. You use Kubernetes for orchestration and know that those Containers are put inside Pods. What your application needs is a way to store data permanently. Can you use the layered-filesystem of your Containers? No, because that gets destroyed as soon as the container is gone. Even if you could store it there, it would be a bad design decision, because a Container should be rather small and stateless. Why? Because they should be able to scale, meaning they can be quickly created and torn down.
In a stateful application, which is an application that creates and saves data that needs to be kept, we have to store our data separately from our application Containers – to a Cloud Storage for example.
Options to store data
There are a lot of Volume Types:
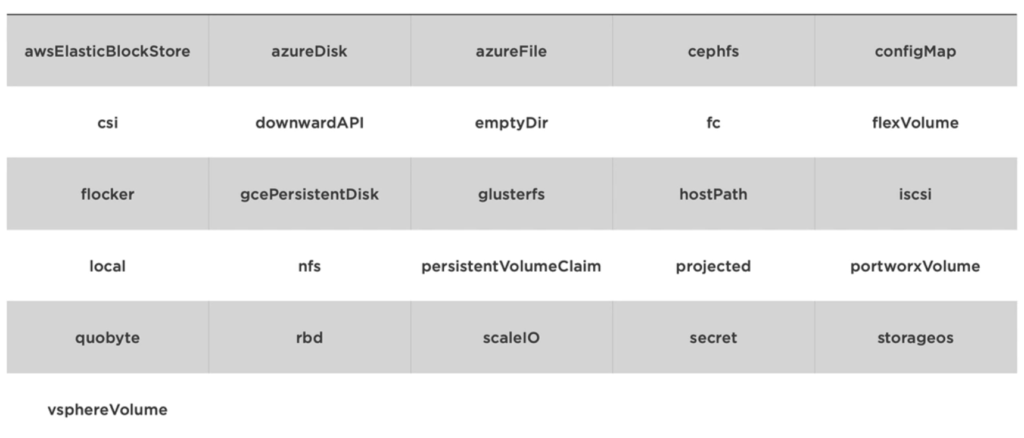
Here are the most common ones
- You can store to an
emptyDirwhich stores “transient” data (shares a Pod’s lifetime). It is useful for sharing files between containers running in a Pod. - The option
hostPathis when a Pod mounts into the node’s filesystem. But if the host is down, so is the data. - A NFS (Network File System) share that gets mounted into the Pod.
configMapand secret (for more sensitive data) are special types of volumes that provide a Pod with access to Kubernetes resources.PersistenVolumeClaimsprovides Pods with a more persistent storage option that is abstracted from the details.- Cluster-Wide storage in the cloud
An example YAML file for a Pod with a emptyDir Volume. Both containers can talk to the same location:
apiVersion: v1
kind: Pod
spec:
  volumes:
    - name: html
      emptyDir: {}
    containers:
      - name: nginx
        image: nginx:alpine
        volumeMounts:
          - name: html
            mountPath: /usr/share/nginx/html
            readOnly: true
      - name: html-updater
        image: alpine
        command: ["/bin/sh", "-c"]
        args:
          - while true; do date >> /html/index.html; sleep 10; done
        volumeMounts:
          - name: html
            mountPath: /html
In the following hostPath example we mount the docker socket of the host to the docker Socket of the container, but there are many more types such as DirectoryOrCreate. Directory. FileOrCreate, File, CharDevice and BlockDevice:
apiVersion: v1
kind: Pod
spec:
  volumes:
    - name: docker-socket
      hostPath:
        path: /var/run/docker.sock
        type: Socket
    containers:
      - name: docker
        image: docker
        volumeMounts:
          - name: docker-socket
            mountPath: /var/run/docker.sock
        command: ["sleep"]
        args: ["10000"]
An Azure type of Volume could look like this:
apiVersion: v1
kind: Pod
metadata:
  name: my-pod
spec:
  volumes:
    - name: data
      azureFile:
        secretName: <azure-secret>
        shareName: <share-name>
        readOnly: false
    containers:
      - name: someName
        image: some-image
        volumeMounts:
          - name: data
            mountPath: /data/storage
All of those configurations can be applied with kubectl apply -f myfile.yml. To get to know which Volume a Pod has you do kubectl describe pod <pod-name>, then look up the Volumes entry.
Persistent Volumes
A PersistentVolume is a cluster-wide storage unit provisioned by an administrator with a lifecycle that is independent from a Pod, meaning the storage exists even after a Pod is gone. As so many things PersistentVolume (pv) is represented as an object in Kubernetes and can be configured via a YAML file. A pv relies on a vendor-specific plugin (abstracted via a Container Storage Interface) that matches your external storage type. In case the storage has many devices, you would have to create many pv objects.
Next, if a Pod intends to read/write from/to the storage it has to make a claim by using a PersistentVolumeClaim (pvc). Now, unless otherwise configured, only that Pod and all of its containers are allowed to access the external storage device. Other pods have to wait for their claim to be accepted.
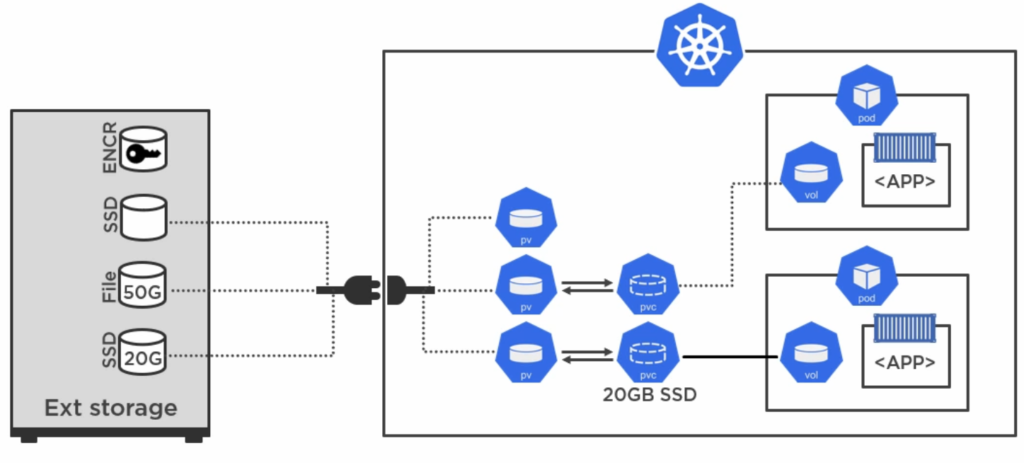
With these “in-between objects” it does not matter anymore if any of your Pods gets destroyed, because the external storage will not be affected.
Static vs. Dynamic Provisioning
There are two ways of setting up the data storage access (aka provisioning): Static and Dynamic. In both files (pv.yml and pvc.yml) you can configure storage size. With Static Provisioning the storage defined in pvc must not be lower than the available storage size in the pv. For example: 50Gi in pvc and 40Gi in pv would not work; the pvc asks for more space than offered and thus does not bind to the storage. On the other hand if the pv offered 60Gi (=10Gi more than asked by pvc) then it would work. With Dynamic Provisioning you always get exactly what you asked for.
Static provisioning
# pv.yml
apiVersion: v1
kind: PersistentVolume
metadata:
  name: task-pv-volume
  labels:
    type: local
spec:
  storageClassName: manual    # referenced in pvc.yml
  capacity:
    storage: 10Gi
  accessModes:
    - ReadWriteOnce
    - ReadOnlyMany
  persistenVolumeReclaimPolicy: Retain    # even if pvc is deleted don't erase the pv
  hostPath:
    path: "/mnt/data"
# pvc.yml
apiVersion: v1
kind: PersistentVolumeClaim
metadata:
  name: task-pv-claim    # referenced in pod.yml
spec:
  storageClassName: manual     # referenced in pv.yml
  accessModes:
    - ReadWriteOnce
  resources:
    requests:
      storage: 3Gi
# pod.yml
apiVersion: v1
kind: Pod
metadata:
  name: task-pv-pod
spec:
  volumes:
    - name: task-pv-storage    # referenced in this file's volumeMounts
      persistentVolumeClaim:
        claimName: task-pv-claim    # referenced in pvc.yml
  containers:
    - name: task-pv-container
      image: nginx
      ports:
        - containerPort: 80
          name: "http-server"
      volumeMounts:
        - mountPath: "/usr/share/nginx/html"
          name: task-pv-storage    # referenced in this file's volume.name
You set the configuration in place with kubectl apply -f pv.yml and kubectl apply -f pvc.yml. You retrieve info via kubectl get pv <pv-name> and kubectl get pvc <pvc-name>.
Check Kubernetes’ doc pages for more Volume settings.
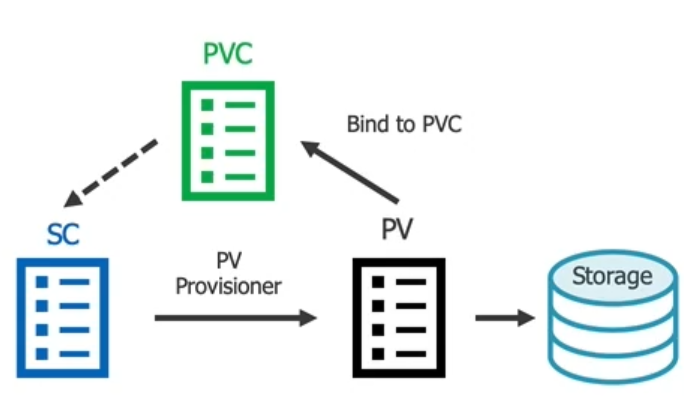
Dynamic provisioning with Storage Classes
In Dynamic Provisioning you create a StorageClass (sc) first. Next, your pvc can reference the StorageClass which will create a pv dynamically. That pv will then automatically bind to the pvc:
# sc.yml
apiVersion: storage.k8s.io/v1
kind: StorageClass
metadata:
  name: my-storageclass
provisioner: kubernetes.io/aws-ebs    # you could use kubernetes.io/no-provisioner but then you have to create a pv yourself
parameters:
  type: gp2
reclaimPolicy: Retain
allowVolumeExpansion: true
mountOptions:
  - debug
volumeBindingMode: Immediate    # or WaitForFirstConsumer (First Pod will trigger creation of PV)
If you have a dynamic provisioner defined, that you would not have to create a pv yourself. But let’s assume we defined kubernetes.io/no-provisioner in the StorageClass, then we would have to define a pv ourselves like this:
# pv.yml
apiVersion: v1
kind: PersistentVolume
metadata:
  name: my-pv
spec:
  capacity:
    storage: 10Gi
  volumeMode: Block
  accessModes:
    - ReadWriteOnce
  storageClassName: my-storageclass    # reference to sc.yml
  local:
    path: /data/storage
  nodeAffinity:
    required:
      nodeSelectorTerms:
      - matchExpressions:
        - key: kubernetes.io/hostname
          operator: In
          values:
            - <node-name>   # If we had multiple nodes then we'd specify here which node to write to
Your pvc file could look like this:
apiVersion: v1
kind: PersistentVolumeClaim
metadata:
  name: my-pvc
spec:
  accessModes:
    - ReadWriteOnce
  storageClassName: my-storageclass   # reference the storage class file
  resources:
    requests:
      storage: 1Gi
Then specify the claim in any Pod, StatefulSet or Deployment:
apiVersion: apps/v1
kind: [Pod | StatefulSet | Deployment]
...
spec:
  volumes:
    - name: my-volume
      persistentVolumeClaim:
        claimName: my-pvc
You list existing storage classes with kubectl get sc. You can edit a config file with kubectl edit sc <name>.
Storage classes are immutable objects once they are created. That means if you need to change your sc config file, you would have to delete the old sc object first before you create a new one.
ConfigMaps and Secrets
ConfigMaps and Secrets are stored in master nodes using etcd, which according to their website is “a distributed, reliable key-value store for the most critical data of a distributed system”. ConfigMaps store non-sensitive configuration information while secrets store sensitive information. Values of both types can be made available to containers of course. Secrets will be made available via tmpfs on a Node and not on disk. Kubernetes only makes secrets available to Nodes that have a Pod requesting the secret.
Stored data can be key/value pairs (access as environment vairables) or entire files (accessed via Volumes). You can define your information via a YAML file (preferred) or enter the info via kubectl directly.
ConfigMap
Creating a ConfigMap
Create from normal file
apiVersion: v1
kind: ConfigMap
metadata:
  name: app-settings
  labels:
    app: app-settings
data:
  FOO: bar
  GREAT: true
Then create it using kubectl create -f file.yml.
Create from normal file
Alternatively you can use an existing non-YAML file that contains key/value pairs and then add the file via kubectl create configmap <cm-name> --from-file=<path-to-file>. The filename becomes the key.
Create from .env file
If you have a .env file you can run kubectl create configmap <cm-name> --from-env-file=<path-to-file> to create a ConfigMap from it.
Create via passing info from CLI
You can create a ConfigMap completely via command line passing in info:
kubectl create configmap <cm-name> \
  --from-literal=apiUrl=https://my-api \
  --from-literal=otherKey=otherValue
Consuming a config map
Get the info with kubectl get cm <cm-name> -o yaml.
If you created it from a file you can access the info, e.g. in your pod either selectively (env) or read them in all together (envFrom) :
apiVersion: v1
kind: Pod
metadata:
  name: lr-nginx
  labels:
    app: nginx
    rel: stable
spec:
  containers:
    - name: lr-nginx
      image: nginx:alpine
      ports:
        - containerPort: 80
      env:    # this will read individually picked variables from the configMap
        - name: FOO
          valueFrom:
            configMapKeyRef:
              name: app-settings
              key: foo
      envFrom:   # this will read in all the variables from the configMap ('foo' and 'great')
        - configMapRef:
            name: app-settings
You can also mount configMap as a volume. In this case the specified configMap keys are turned into files having the key-value as content. In our example file foo with content bar and a file great with content true would be available at the mount point /etc/config:
apiVersion: v1
kind: Pod
metadata:
  name: lr-nginx
  labels:
    app: nginx
    rel: stable
spec:
  volumes:
    - name: app-config-vol
      configMap:
        name: app-settings
  containers:
    - name: lr-nginx
      image: nginx:alpine
      ports:
        - containerPort: 80
      volumeMounts:
        - mountPath: /etc/config
          name: app-config-vol
Of course you could then process the environment variables in your NodeJS application via process.env.FOO or (when a volume was used) read in the file with fs.readFile('/etc/config/foo', ...).
Things to consider using a Secret
Since Secrets are storing confidential info we have to make/think of some more precautions:
- We should enable encryption-at-rest
- We could create a Secret YAML manifest file but have to keep in mind that the info in there is not encrypted, only base64 encoded (discouraged)
- We have to limit access to etcd (where Secrets are stored) to admins only
- We have to use SSL/TLS fro etcd peer-to-peer communication
- Because pods can access Secrets, we have to secure which users can create Pods. Therefor role-based access control (RBAC) can be used
Creating a Secret
Secret is just another Kubernetes object and it can have multiple individual key/value pairs stored. There are two types of Secrets: Generic-type (files or text) and TLS-type. To create a Secret straight from command line run:
kubectl create secret generic my-secret \
  --from-literal=pwd=my-password  \
  --from-literal=other-pwd=my-other-password
my-secret now contains pwd and other-pwd. From file:
kubectl create secret generic <secret-name> \
  --from-file=ssh-privatekey=~/.ssh/id_rsa \
  --from-file=ssh-publickey=~/.ssh/id_rsa.pub
If TLS-type is used (requires certificate and key):
kubectl create secret tls <secret-name> \
  --cert=path/to/tls.cert \
  --key=path/to/tls.key
Consuming a Secret
List secrets with kubectl get secrets or a specific secret with kubectl get secrets db-passwords -o yaml. Stored secrets would be displayed as base64 encoded values.
Let’s assume we have a Secret like this in etcd storage:
apiVersion: v1
kind: Secret
metadata:
  name: db-passwords    # referenced in Pod
types: Opaque
data:
  db-password: hid4sidugh3=
  admin-password: dfiu389fanFGD=
apiVersion: v1
kind: Pod
metadata:
  name: lr-nginx
  labels:
    app: nginx
    rel: stable
spec:
  containers:
    - name: lr-nginx
      image: nginx:alpine
      env:
        - name: DATABASE_PASSWORD
          valueFrom:
            secretKeyRef:
              name: db-passwords   # reference to Secret
              key: db-passwords
Or if a volume should be used instead:
apiVersion: v1
kind: Pod
metadata:
  name: lr-nginx
  labels:
    app: nginx
    rel: stable
spec:
  containers:
    - name: lr-nginx
      image: nginx:alpine
      volumeMounts:
        - name: secrets
          mountPath: /etc/db-passwords  # folder 'db-passwords' containing each secret as separate file
          readOnly: true
  volumes:
    - name: secrets
      secret:
        secretName: db-passwords  # reference to Secret
About Author

I am Mathias from Heidelberg, Germany. I am a passionate IT freelancer with 15+ years experience in programming, especially in developing web based applications for companies that range from small startups to the big players out there. I create Bosycom and initiated several software projects.