The basic idea behind Kubernetes (aka K8s) is that you declare/describe the desired state of your application infrastructure via a manifest file, for example: “Run 3 nodes in 1 cluster, each containing my application”. Kubernetes will spin it all up, observe the actual state with the desired state continuously and adjust/reconcile if necessary. For example, in the case that a node is down, Kubernetes tries to automatically create a new one. Kubernetes can also auto-scale by automatically adding additional nodes in case more resources such as CPU performance is temporarily required.
Use cases for developers
- Emulate production locally
- Move from Docker Compose to Kubernetes
- Create end-to-end testing environment
- Ensure application scales properly
- Ensure secrets/config are working properly
- Performance testings scenarios
- Use for build servers in workload scenarios (CI/CD)
- Learn different deployment strategies (Zero downtime deployment, A/B testing)
- Help DevOps create resources and solve problems
Kubernetes hierarchy
As there are a lot of parts involved to make it all happen, it is essential to get a basic understanding of the hierarchy and terminology:
- Kubernetes Cluster
- Master nodes aka Control plane
- Worker nodes
- Pods
- Containers
- Your application code
- Containers
- Pods
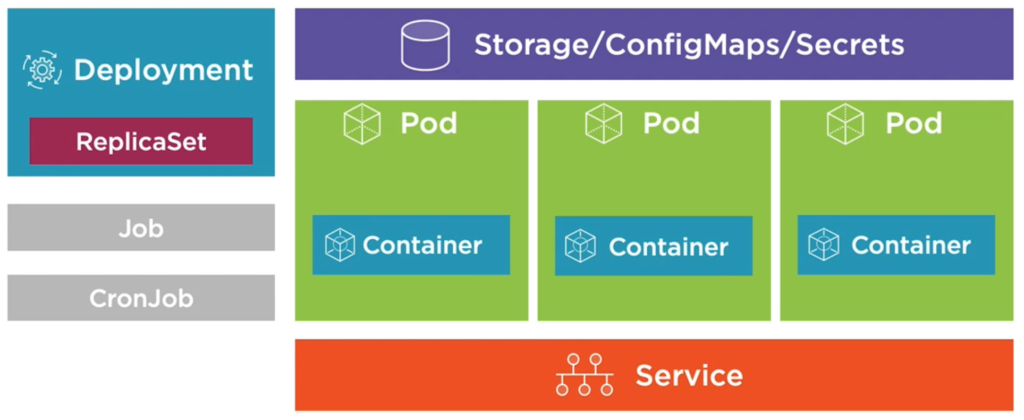
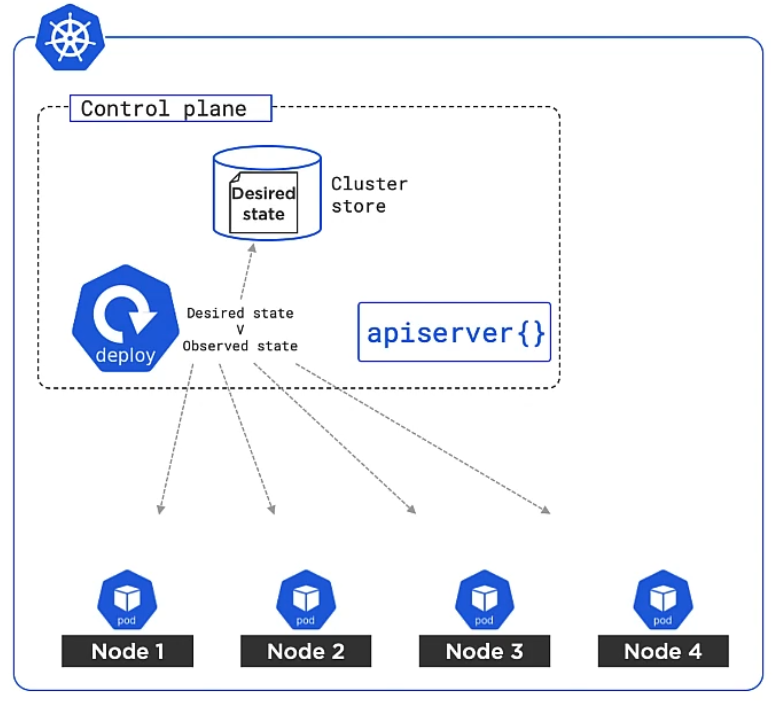
Generally, a cluster is a collection of nodes. A node is a physical or virtual machine. A Kubernetes Cluster consists of Master nodes (also called Control plane) that are in charge of orchestrating the remaining Worker Nodes in the cluster.
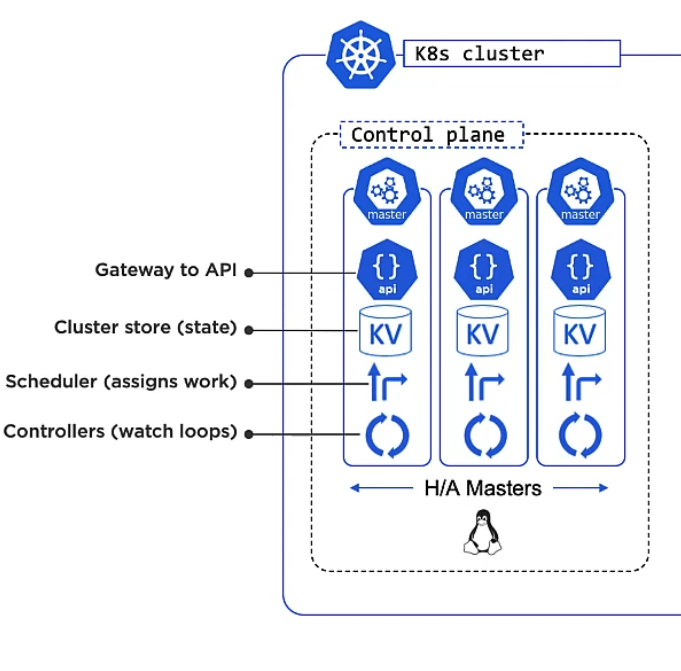
Amongst the Master nodes there is only one leader and the remaining Master nodes are followers. They just proxy any connection or request to the leader. In case the leader is down, followers elect a new one.
To reach consensus you need an uneven number of Master nodes (3 or 5 are considered ideal). Master nodes run on Linux. Each Master runs a bunch of smaller services that represent the control plane features. On a hosted Kubernetes platform those Masters are hidden from you and out of your control, you only get an API to interact with them. In that case you do not need to take care of performance, availability, updates/upgrades of the master nodes, but host providers let you pay for this service of course. If you self-host Kubernetes then you have full control over your Master nodes with all the responsibility that comes with it. Your business application should not run directly on Master Nodes, but on Worker Nodes.
Parts of a Master Node
Let’s have a look at what a Master node consists of:
You have kube-apiserver which is the main access gate to the control plane. All communication to the Master nodes goes through this, that includes any command/request that you or any Worker node or even any other Master node sends. It is a REST service that consumes JSON and YAML. For example, we simply describe how our business applications are supposed to run via a YAML file, send it to the kube-apiserver and it will take care of orchestrating everything. The command line tool that you use to access the kube-apiserver is kubectl.
The Cluster Store is the only persistent part of a Master Node where cluster state and config is stored (based on etcd). This is where your YAML manifest file is stored.
The Kube-controller-manager controls other controllers, such as Node Controller, Deployment controller or Endpoints/EndpointSlice controller which in turn run in a watch loop, meaning that they observe the current state and compare it with the previously defined desired state and act accordingly if they mismatch.
The Kube-scheduler watches the API Server for new work tasks and assigns work to cluster nodes. The scheduler deals with – buzz word alert – Affinity/Anti-Affinity, Constraints, Taints, Resources and others.
Let’s extend our basic Kubernetes hierarchy from above:
- Kubernetes Cluster
- Master nodes aka Control plane
- Kube-apiserver (kubectl)
- Cluster Store
- Kube-controller-manager
- Kube-scheduler
- Worker nodes
- Pods
- Containers
- Your application code
- Containers
- Pods
- Master nodes aka Control plane
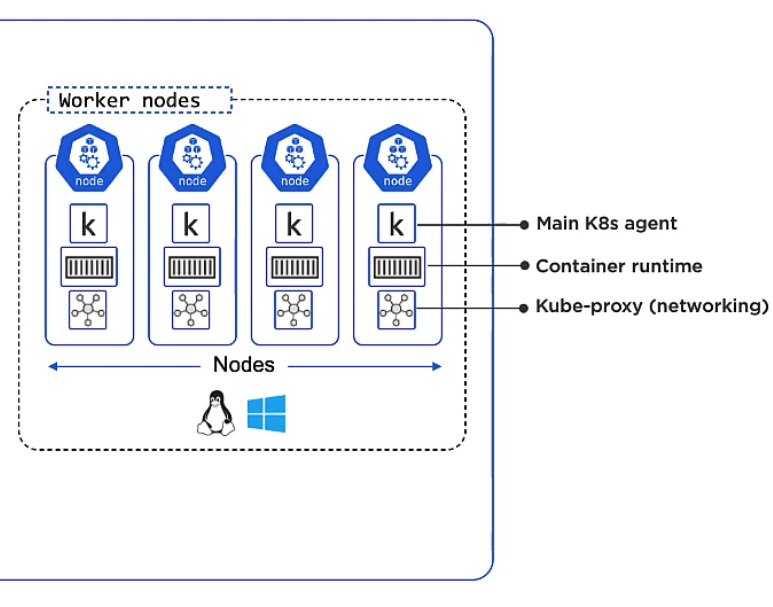
Parts of a Worker Node
A Worker Node consists of:
Kubelet is the main Kubernetes agent and is such an integral part of a node that it is often referred to as ‘node’ interchangeably. It registers the machine (which can be anything from physical, to virtual, from Linux to Windows) as a node in the cluster and adds its CPU, RAM and other resources to the overall cluster resource pool. Kube-scheduler (the master component, see above) can intelligently assign work to the Worker Node.
Any Worker Node also watches the API Server for work which comes in the form of Pods. A Pod is like a package consisting of one or more Containers. A Pod is Kubernetes’ most atomic deployable unit. Containers must always be placed within a Pod. Finally, a Worker Node also reports back to Masters about the state of its running apps.
Kubelet does not know how to deal with Containers, that’s what the Container runtime within a Worker Node is for. It is a pluggable abstraction layer, a so called Container Runtime Interface (CRI) which allows you to use any Container system such as Docker, containerd, CRI-O or Kata.
Kube-proxy is another component within a Worker Node and handles networking. You can think of it as the network gateway or light-weight load balancer for the containers in the Pod. Every Pod gets its own unique IP. You can connect to a Pod’s container via the Container’s port.
Let’s enhance our Kubernetes hierarchy from above again by adding the parts of a Worker Node:
- Kubernetes Cluster
- Master nodes aka Control plane
- Kube-apiserver (kubectl)
- Cluster Store
- Kube-controller-manager
- Kube-scheduler
- Worker nodes
- Kubelet (agent)
- Container runtime interface (CRI)
- Kube-proxy
- Pods
- Containers
- Your application code
- Containers
- Master nodes aka Control plane
At this point you could ask yourself: Why do I have to define machines in a Kubernetes cluster? Why not make hosting my containers even simpler and just use a cloud service where I can simply say: Here are my containers, I want you (the cloud service) to take care of how they are executed! And that’s where Virtual Kublet comes into play. It is a Nodeless Kubernetes solution that let your containers run in Pods that are hosted on the Cloud providers’ container back-end.
API and API Server
- Kubernetes API
- API Server (REST)
- kubectl
- API Server (REST)
Most of Kubernetes’ bits and pieces (Pods, Services, Nodes, Deploys etc.) are represented by objects in the Kubernetes API. Those objects are grouped in core, workloads/apps, storage, networking and more. You can communicate with that API using the API Server via REST or you can use kubectl to send CLI commands to the API Server.
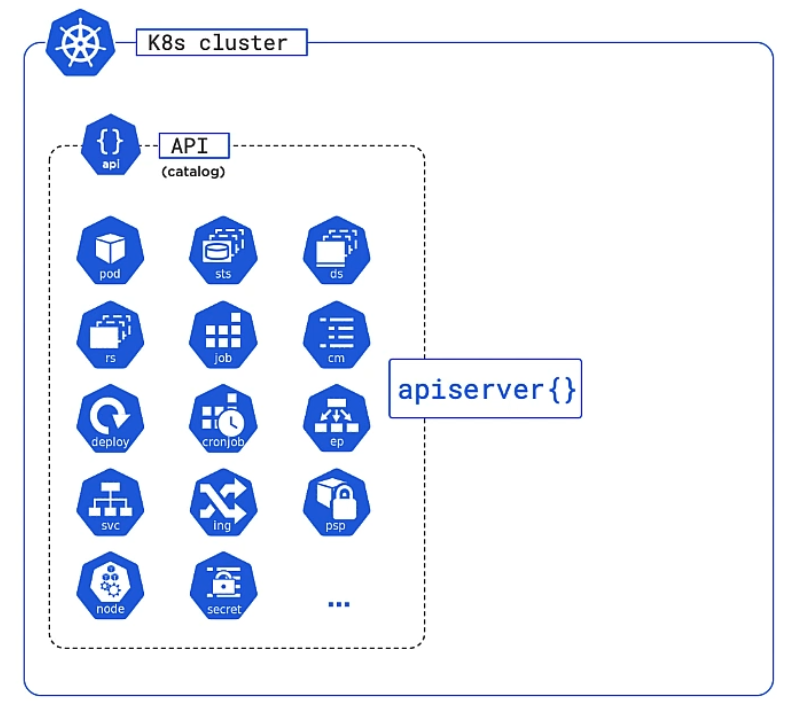
You write your code, create an image from it, push that image to a registry, reference the registry and image in Kubernetes manifest file and POST the file to the APIServer.

Kubectl
There are different locations where Kubernetes is used: Locally on your PC or Mac (e.g. with Docker Desktop or Minikube) for development only, remotely on a self-hosted server or a third-party cloud provider like Linode or Google Kubernetes Engine (GKE). I don’t want to get into the boring details here. Instead I explain the common concepts.
Kubectl configuration is located as YAML file in ~/.kube/config. It defines clusters, users and puts them together into a context.
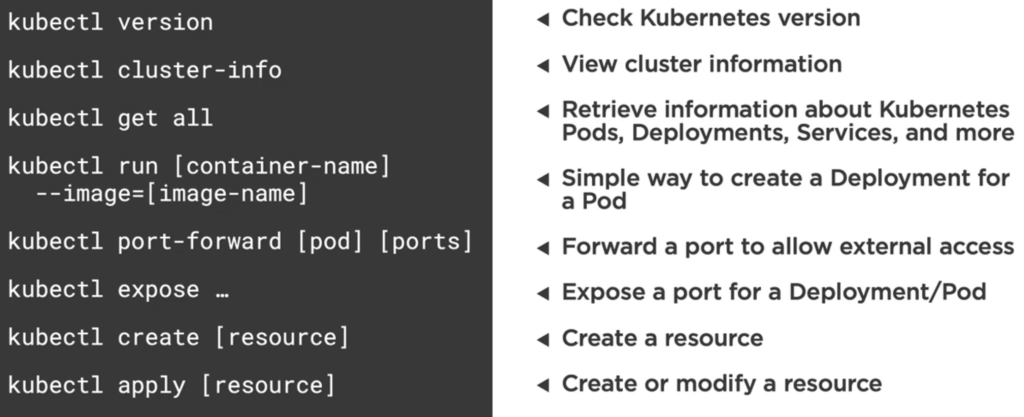
Your specification YAML files for Pods, Deployments, Services etc. can be applied with kubectl apply -f /path/to/my.yml. Instead of pointing to a YAML file you point to a folder and all containing YAML files would be executed.
You can get more specific info about resources, for example with kubectl get nodes.
Shell into a running container within a Pod using:
kubectl exec --stdin --tty my-container -- /bin/sh
Namespaces
In Kubernetes you can group objects together into virtual clusters, called namespaces. A Kubernetes namespace provides the scope for Pods, Services, and Deployments in the cluster. Users interacting with one namespace do not see the content in another namespace. Kubernetes starts with four initial namespaces: default (namespace for objects with no other namespace), kube-system The namespace for objects created by the Kubernetes system, kube-public (reserverd for cluster usage in case some ressources should be visible) and kube-node-lease (improves performance as cluster scales).
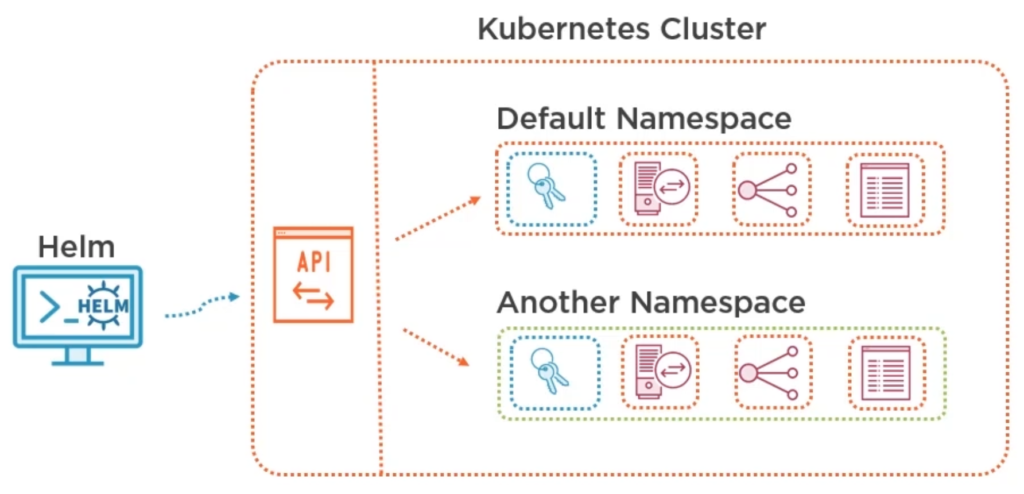
Most Kubernetes resources (e.g. pods, services, replication controllers, and others) are in some namespaces. However namespace resources are not themselves in a namespace. And low-level resources, such as nodes and persistentVolumes, are not in any namespace.
You can add more namespaces, for example one for production and one for development. You create namespaces via a YAML file:
# Display all namespaces
kubectl get namespaces --show-labels

# Set namespace for a request
kubectl run nginx --image=nginx --namespace=<insert-namespace-name-here>
kubectl get pods --namespace=<insert-namespace-name-here>

# List resources in a namespace
kubectl api-resources --namespaced=true

# List resources not in a namespace
kubectl api-resources --namespaced=false
{
  "apiVersion": "v1",
  "kind": "Namespace",
  "metadata": {
    "name": "production",
    "labels": {
      "name": "production"
    }
  }
}
---
{
  "apiVersion": "v1",
  "kind": "Namespace",
  "metadata": {
    "name": "development",
    "labels": {
      "name": "development"
    }
  }
}
To work with namespaces you have to create a context for each of them so that we will be able to switch between namespaces accordingly. For that we must get the cluster and user first:
# Show info about cluster, context, certificate and namespace
kubectl config view
Then we create the contexts:
# copy cluster and user from current context to new contexts dev and prod:

kubectl config set-context dev --namespace=development \
  --cluster=<copy cluster info from kubectl config view> \
  --user=<copy user info from kubectl config view>

kubectl config set-context prod --namespace=production \
  --cluster=<copy cluster info from kubectl config view> \
  --user=<copy user info from kubectl config view>
You switch to a context with kubectl config use-context dev. At this point, all requests we make to the Kubernetes cluster from the command line are scoped to the development namespace.
This is how you can delete/remove/unset a context, user or anything from config:
# display current context
kubectl config current-context

# list all contexts
kubectl config get-contexts

# switch to a context
kubectl config use-context do-sfo2-example-cluster-01

# create/update/modify a context
kubectl config set-context <context-name> --namespace=<namespace-name> --cluster=<cluster-name> --user=<user-name>

# delete/unset a config value or whole context
kubectl config unset users.<user-name>
kubectl config unset contexts.<context-name>
kubectl config unset clusters.<cluster-name>
Other useful Kubernetes commands
Inspecting container logs within Kubernetes with kubectl logs or for a specific container <pod-name>kubectl logs . You can view the logs for a previously running Pod with <pod-name> -c mycontainerkubectl logs -p <pod-name> and stream a Pod’s log with kubectl logs -f <pod-name>.
About Author

I am Mathias from Heidelberg, Germany. I am a passionate IT freelancer with 15+ years experience in programming, especially in developing web based applications for companies that range from small startups to the big players out there. I create Bosycom and initiated several software projects.