What is Helm and why would you need it? What problem does it solve?
How you deploy to Kubernetes without Helm
Maybe so far you have deployed your applications to Kubernetes by doing these steps:
- Create Docker Images of your application code
- Create YAML files specifying Kubernetes objects that your application requires (Deployment, Services, Secret, ConfigMaps etc.)
- You apply all the files via
kubectl apply -f /folder/to/spec-filesor individually
The problems that Helm solves
One challenge with this approach is that you are already dealing with a lot of Kubernetes object. It would be great to group objects together into one package.
That package would then represent your application at a certain state. One problem is that there is not a consistent strategy to version your application state. It would be great if we could version our application.
Each object might depend on another one, so the order on how you apply them is important. It would be great to define dependencies.
What’s even worse: If you want to roll back your application to a previous state, you would have to roll back each object in a specific order. It would be great to have a consistent roll back mechanism for all involved objects.
It would be great to have several releases running in different environments at the same time.
That’s where Helm can help you with.
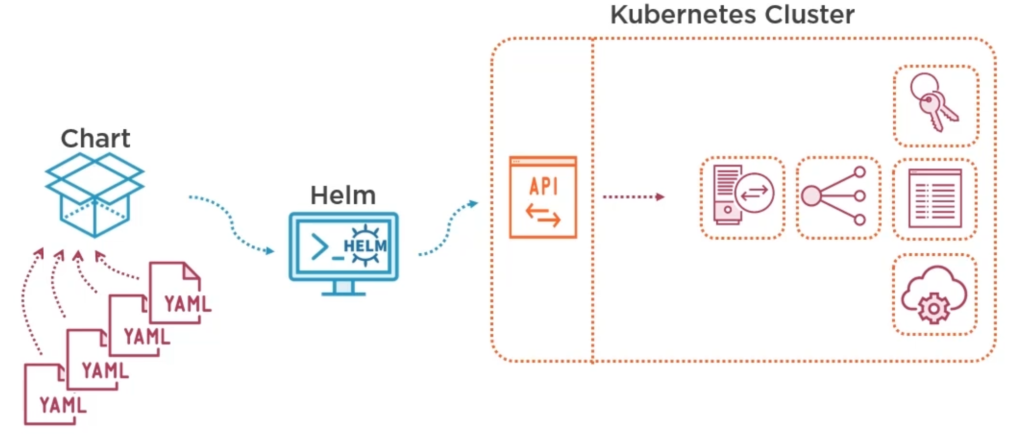
Helm is a package manager for Kubernetes and the packages are called Charts and a release is an instance of a Chart. Charts are usually stored in a online Chart repository. Charts do not contain your application code directly, instead they contain Kubernetes specification YAML files, which in turn reference Docker images of your application code.
You might want to install multiple instances, for example one test and dev release on different clusters. Similar to package managers that you might already be familiar with (e.g. apt, npm, pip, maven) you can use helm to install or upgrade Kubernetes packages.
You bundle your YAML files into a Chart, pass it on to Helm and Helm will use the Kubernetes API to set everything up. The whole configuration is specified in a manifest which will get stored as Secrets in Kubernetes. This provides a history of all releases.
When deploying Charts there is the possibility for conflict, very similar to conflicts in software development: One developer pushes new code to the same file that you are currently working on. Now, when it is your turn to push commits, a conflict exists that need to be resolved if it cannot be merged automatically. The same applies to Helm Charts: You have your old Chart, deploy it, then another person (or even another software) makes a change to the Kubernetes objects. Now, as soon as you want to install an updated version of your Chart you run into conflicts. Helm tries to solve the conflicts automatically via what is called a three-way-merge patch, even in case you roll back to your old chart.
In Kubernetes you can group objects together into virtual clusters, called namespaces. Helm stores its configuration in the same namespace as its release. But it can also install objects in other namespaces.
Difference between Helm 2 and Helm 3
There are significant architectural differences between Helm version 2 and Helm version 3: Helm 2 consists of two Components: A client side command line tool helm and a server-side component called Tiller. Tiller runs inside a Pod in your cluster and manages releases, stores Charts, installation history and configuration in a ConfigMap, by default in the system namespace. In contrast, Helm 3 stores configuration as Secrets in Kubernetes. Whenever you can, use the newer Helm version.
Helm client communicates with Tiller over gPRC. Tiller uses Kubernetes APIServer to manage Kubernets objects and requires a lot of rights to create, delete and update Kubernetes objects. That’s why Helm 2 requires a secured ServiceAccount and an encrypted gRPC connection. In Helm 3 there is no Tiller and no gRPC anymore, it’s much simpler.
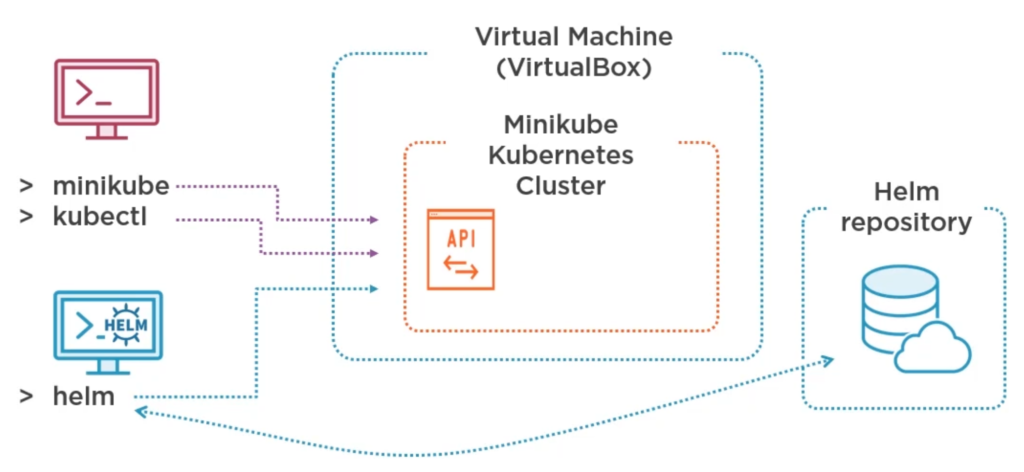
Minikube with Helm
We create a development environment using a VirtualBox Virtual Machine with Linux, Minikube, Ingress and Helm.
After installation of Minikube run minikube start. Next, we enable ingress addon within Minikube.
minikube addons enable ingress
Ingress is a reverse proxy that we need in order to access our test application. We identify the IP address that our Minikube cluster runs on with minikube ip. Since we want to enter names instead of IP addresses we create host entries for frontend and backend in /etc/hosts with
printf "\n%s frontend.minikube.local\n%s backend.minikube.local" $(minikube ip) $(minikube ip) | sudo tee -a /etc/hosts
Install kubectl according to Kubernetes website. Finally, check minikube status.
Install helm from the official website:
$ curl -fsSL -o get_helm.sh https://raw.githubusercontent.com/helm/helm/master/scripts/get-helm-3
$ chmod 700 get_helm.sh
$ ./get_helm.sh
Helm will install packages in the same cluster as kubecetl is configured to do. Check it via kubectl config view. By default Helm 3 is not configured to use any Chart repository, so add the official repository:
helm repo add stable https://charts.helm.sh/stable
You could now install and uninstall a mysql demo for example with
helm install demo-mysql stable/mysql

helm uninstall demo-mysql
If you intend to completely remove helm you can delete the files listed when you run the command helm env.
Building Helm Charts
Structure of a Helm Chart
A Helm Chart can be create with helm create my-app. As you edit your chart, you can validate that it is well-formed by running helm lint. It is a folder (though in can be compressed to a file) with a structure similar to this:
- my-chart-name
- charts
- mongodb-7.8.4.tgz
- Chart.yaml
- crds
- README.md
- LICENSE
- requirements.yaml
- templates
- deployment.yaml
- _helpers.tpl
- ingress.yaml
- NOTES.txt
- service.yaml
- tests
- test-connection.yaml
- values.schema.json
- values.yaml
- charts
The folder templates contains Kubernetes YAML specifications which usually make use of template variables that are defined in the root’s values.yaml file. The file requirements.yaml only exists for Helm 2 compatibility and lists dependencies. In Helm 3 you should add dependencies in Chart.yaml instead along with other metadata. Alternatively you can put dependencies into charts folder as files. You can document your chart in README.md and put license info to LICENSE. The content of NOTES.txt is displayed to the user after the chart got installed. The file values.schema.json can optionally define the structure of values.yaml.
The folder tests can contain pod definitions used for testing. The folder crds can contain Kubernetes custom resources definitions. Both folders are optional.
Chart.yaml
apiVersion: v2      # v2 for Helm 3 (Helm 2 uses v1)
name: chart-demo
description: A Helm chart for Kubernetes
keywords:
  - demo
type: application   # use 'library' to make this a helper package that does not produce artifacts
appVersion: 1.16.0  # The version of your application
version: 0.1.0      # The version of this chart
dependencies:
  ...
A release is also called a Chart instance. To avoid conflicts with multiple instances in one cluster, you have to chose different/unique names for your Kubernetes objects and different exposed port numbers. That’s why the names of objects are all based on the release name. Helm template variables help you to do that.
You can always update an existing release instead of deploying a new one every time there is a change. That is referred to as creating a revision. Don’t mix up the revision with the version in Chart.yaml, because the latter only changes when the structure of the Chart changes (for example a new service specification). But a revision refers to a change in the running instance of that Chart, for example if the Chart did not change but is installed with different values.
Helm main commands
Most of the time you want to helm install <release> <chart> or check the helm status <release>. You can helm show values to see which values you can adjust before installing a chart.
# Install a chart from a previously defined repository
helm install <release> <chart>

# Install a local chart archive
helm install foo foo-0.1.1.tgz

# Install an unpacked chart directory
helm install foo path/to/foo

# Install from a full URL
helm install foo https://example.com/charts/foo-1.2.3.tgz

# Install a chart with generated release name
helm install <chart> --generate-name

# Install Chart 'myredis' from local folder './redis' using custom values from 'myvalues.yaml'
helm install -f myvalues.yaml myredis ./redis
helm install --values myvalues.yaml myredis ./redis

# Set custom variables when installing Chart './redis' as release 'myredis'
helm install --set name=prod myredis ./redis
# Multiple values are separated by , characters
For more options on how to manually –set values such as nested values or arrays of values visit format and limitations of set from the official website.
helm upgrade <release> <chart>
helm rollback <release> <revision>

# print release history (including revision)
helm history <release>

# display release status (including revision)
helm status <release>
helm get all <release>
helm uninstall <release>

# List of all deployed releases in current namespace
helm list

# List of all deployed releases in all namespaces
helm list --all-namespaces

helm get manifest <release>
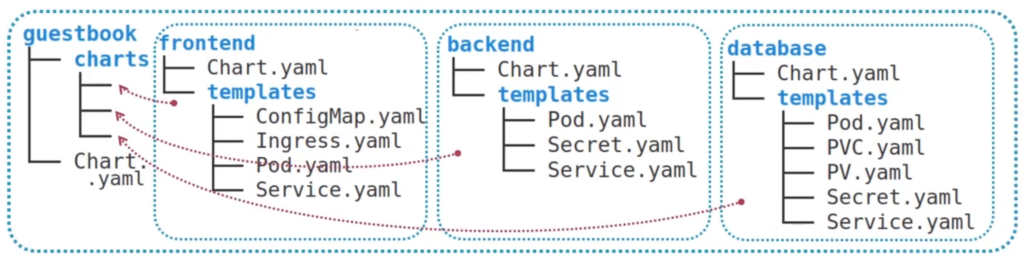
Umbrella Charts
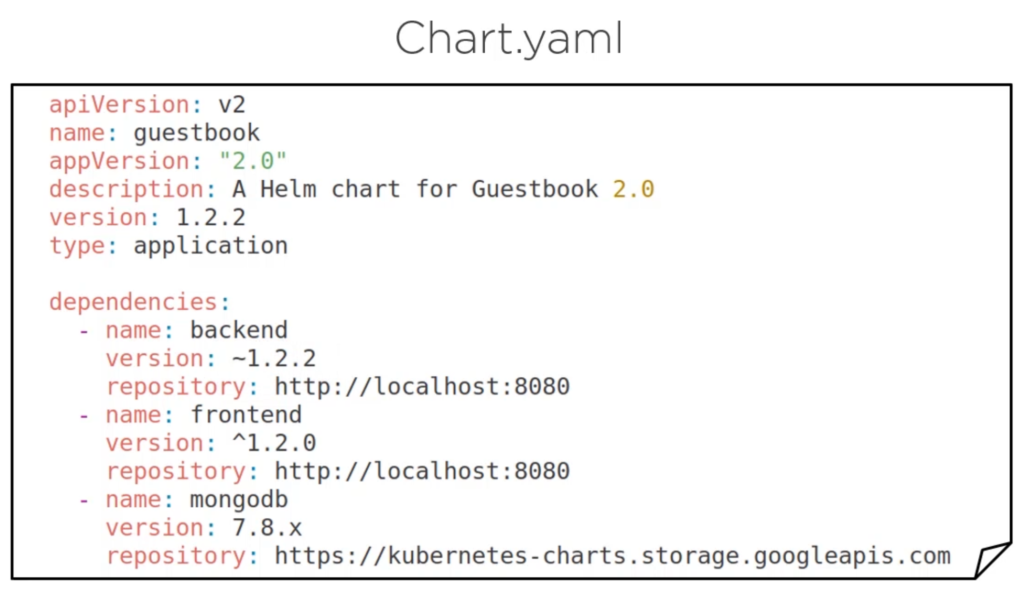
A Chart that contains many Charts is called Umbrella Chart. In the following illustration the Umbrella Chart guestbook contains the Charts frontend, backend and database. Another way to put this is: guestbook has frontend, backend and database as dependencies. The dependencies can be folders or tar-archive files.
Helm Template Engine
Helm is all about creating a smooth install and upgrade process for you application code. The idea is to create a Chart that is can be adjusted dynamically via command line or by providing a file, instead of manually changing values within a Chart specification. That’s why Helm provides a template engine that supports variables, functions, pipes etc.
Template variables
It is cumbersome and error prone to edit your YAML files within a helm package manually, for example changing the version of an image in a pod YAML file. Use template variables instead and then specify the version via command line (set key=value or specify a file with values). Another reason why we use template variables is to create unique names for our Kubernetes resources, which is a requirement if we install multiple instances on the same cluster. Even if you intend to install it on different clusters you should still use the Helm template engine and strive to make your Helm Charts suitable for any use case.
Remember to replace any dash in template variable names with an underscore.
Helm is written in Go and uses the Go template engine which encloses values {{likethis}}. Helm replaces the templates with values when you run the helm command, then creates the final manifest and sends it to the Kubernetes API.
First, the curly brace syntax of template declarations can be modified with special characters to tell the template engine to chomp whitespace. {{- (with the dash and space added) indicates that whitespace should be chomped left, while -}} means whitespace to the right should be consumed. Be careful! Newlines are whitespace!
You can read the processed values by running helm get manifest <release> or helm get values. You can test the template:
# testing statically, works without K8s cluster, static release name
helm template <chart>

# real helm install but without commit, can generate a release name
helm install <release> <chart> --dry-run --debug
Which values can you use and where are they defined? Either of those:
Values in values.yaml:
# values.yaml
service:
  type: NodePort
  name: myservice
  port: 80
  labels:
   - first: one
   - second: two
Usage in template:
# the template
apiVersion: v1
kind: Service
metadata:
  name: {{Values.service.name}}
  label: {{Values.service.labels[0].first}}
- by defining a custom file with
helm install -f my-other-values.yml - from command line with
helm install --set foo=bar
Command line variables overwrite variables in files.
You can create a values.schema.json for values.yaml:
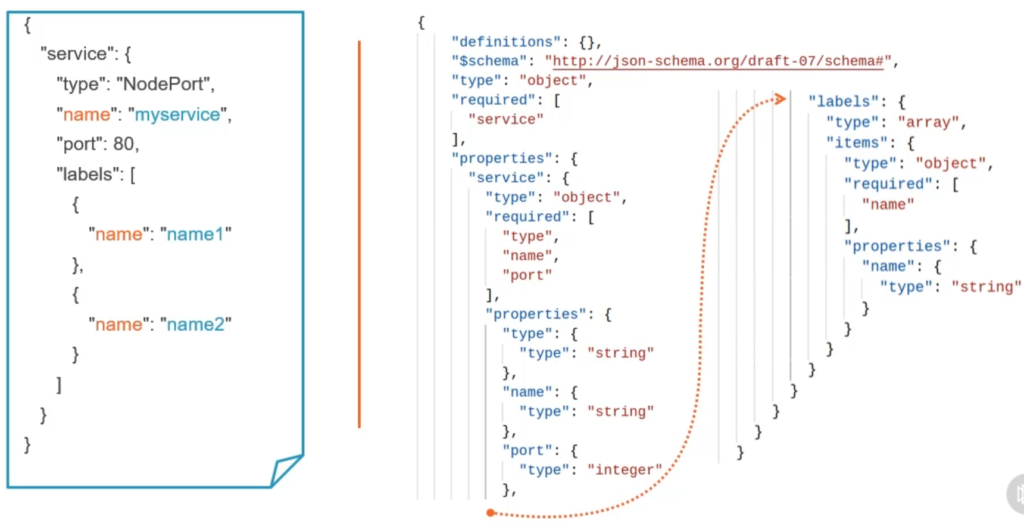
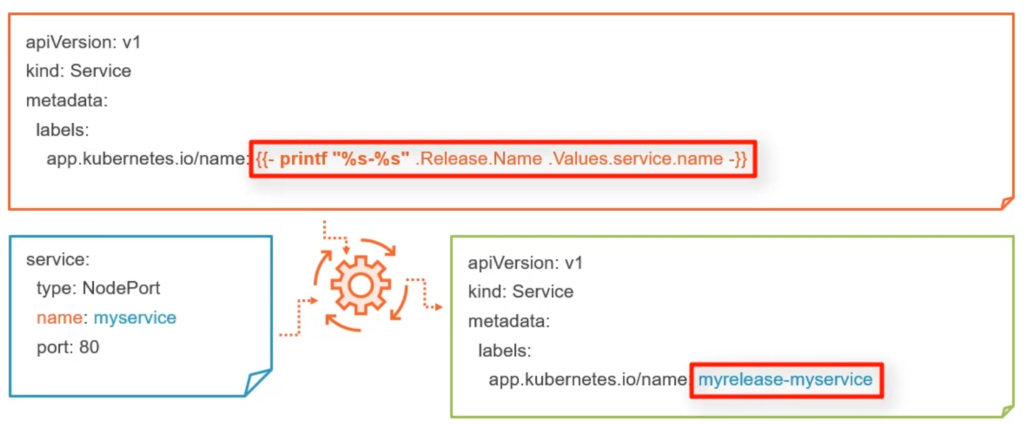
You can read in values from Chart.yaml with {{.Chart.Name}}. Note that there is a dot at the beginning and the first letter is in uppercase in the template.
You can read in values from release runtime with {{.Release.Name}}. Besides Name you can access Namespace, Service, Revision, IsUpgrade and IsInstall.
You can read in {{.Capabilities.APIVersion}} and KubeVersion, KubeVersion.Minor or KubeVersion.Major.
You can read in from files, relative to the root of the chart (cannot be located in template directory), with {{.Files.Get conf.ini}}.
You can read in data from the template itself such as {{.Template.Name}} or BasePath.
To give your objects a unique name you can consider using this pattern:
metadata:
  name: {{.Release.Name}}-{{.Chart.Name}}-config   # instead of 'frontend-config'
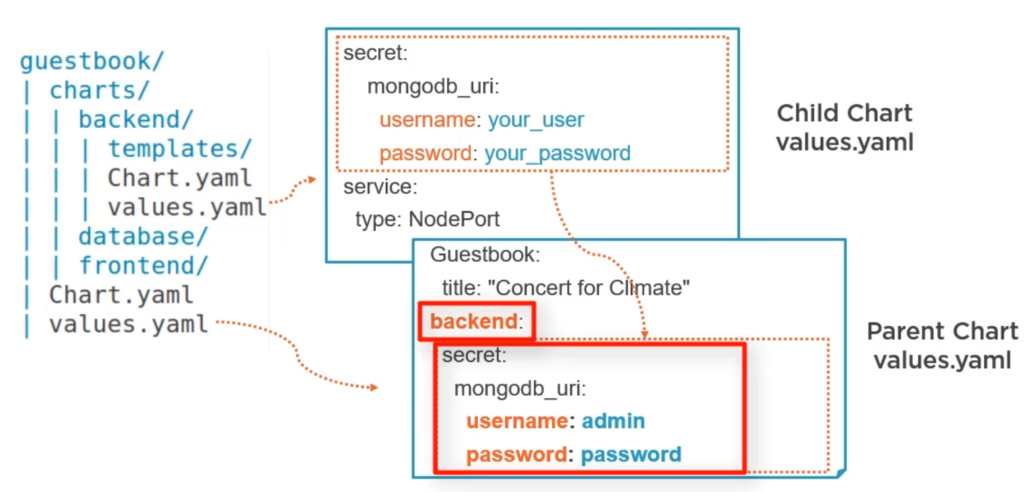
In Umbrella Charts the Umbrella’s values.yaml overwrites values from Child Charts.
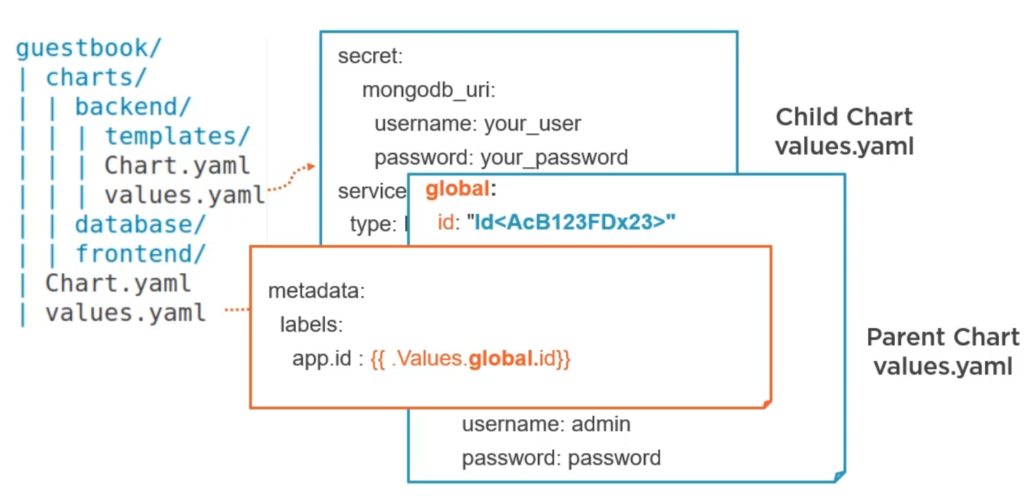
You can define global values in the Umbrella chart using global property. Global values will be available in every Chart as {{.Values.global}}.
You can display all computed values with helm get all <release>.
Functions and Pipelines
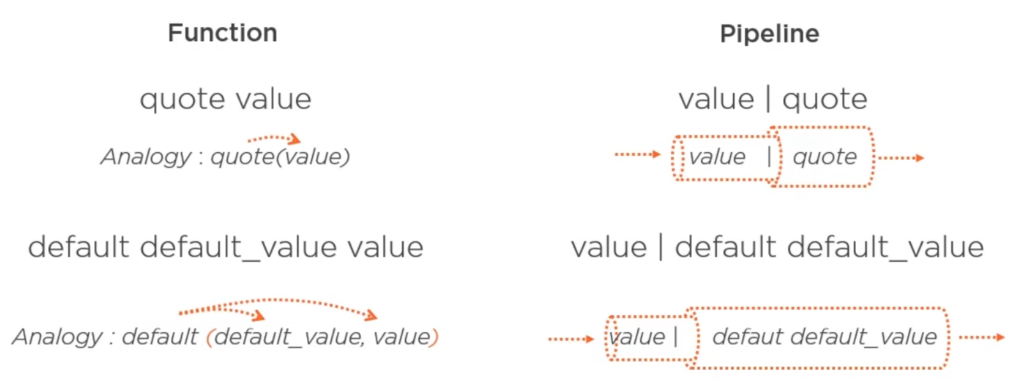
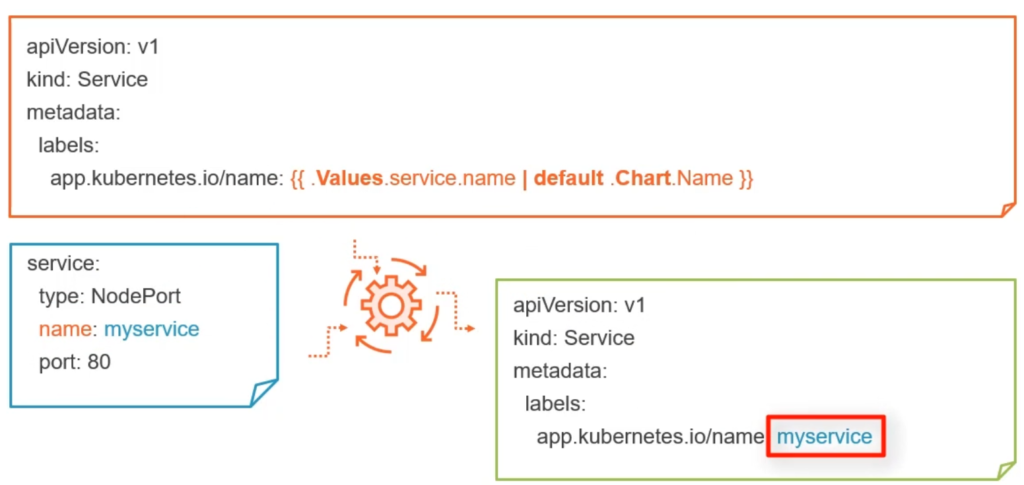
Using a pipeline to create a default value:
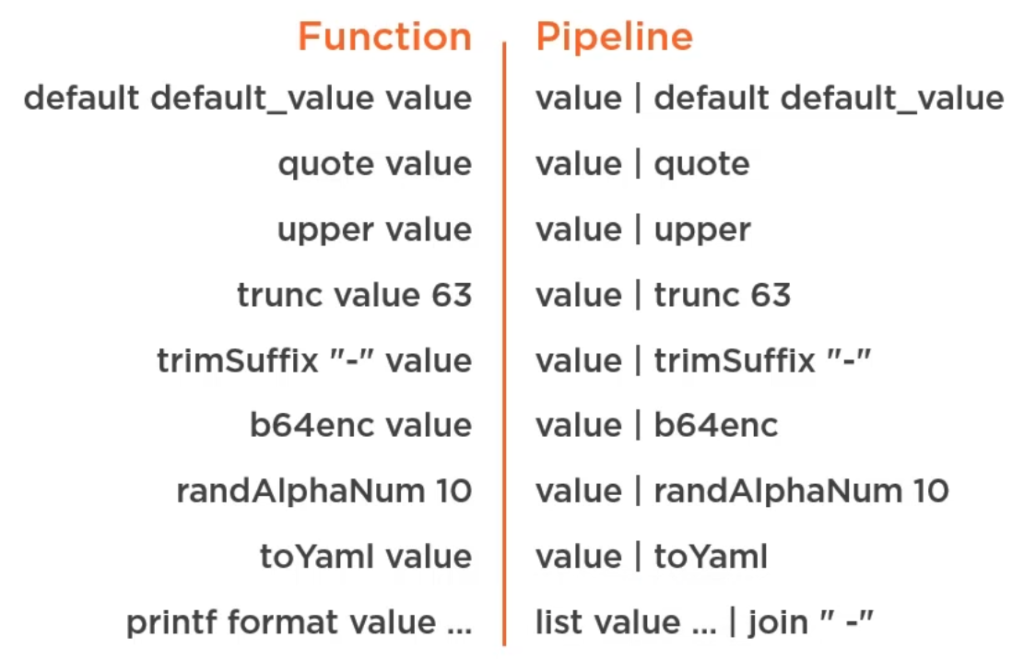
Kubernetes letters are limited to 64 characters, you can use trunc 63 for that. randAlphaNum 10 creates a random alphanumeric password of length 10. You apply those pipeline like {{ .Values.service.name | trunc 63 | trimSuffix "-" }}.
Use with to reduce typing the full path over and over:
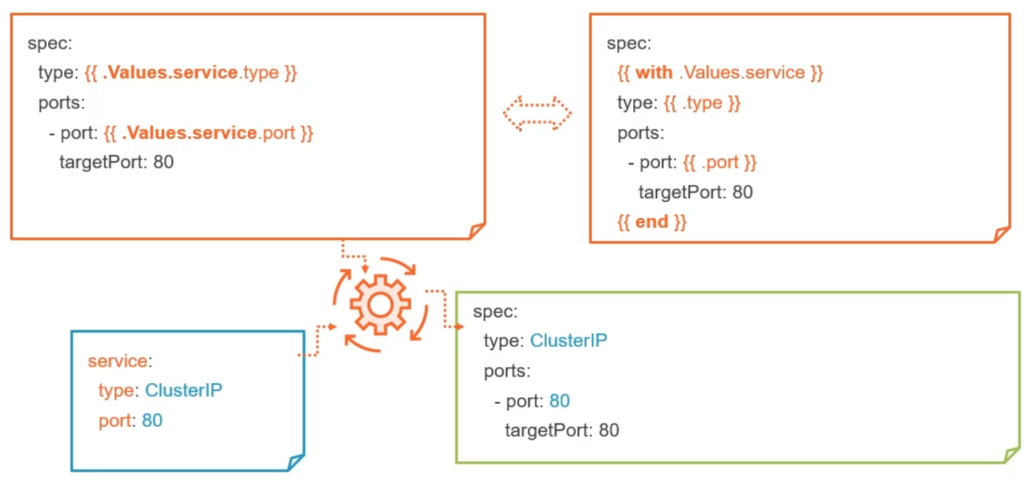
With statement
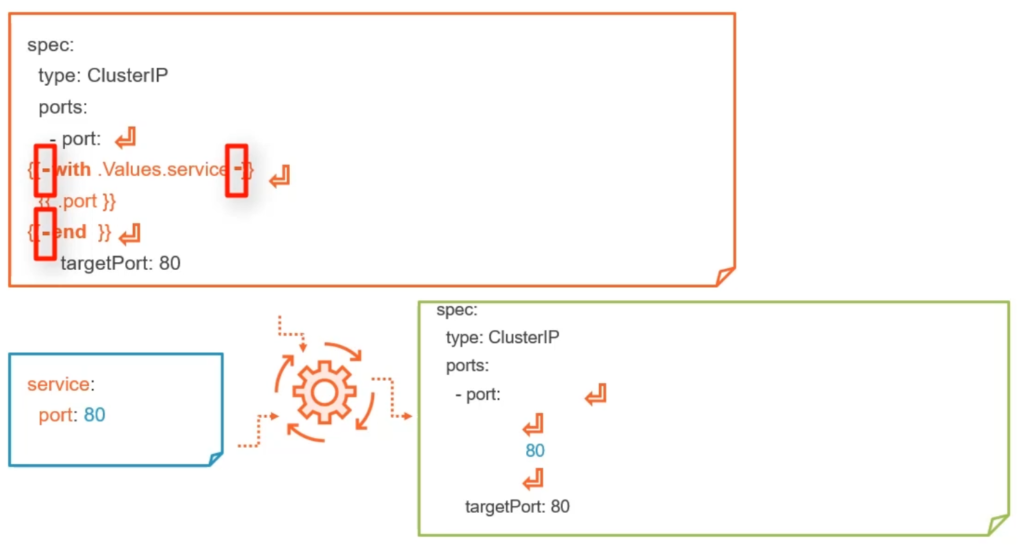
Unfortunately the with statement creates a blank line, but it can be removed using a dash like this:
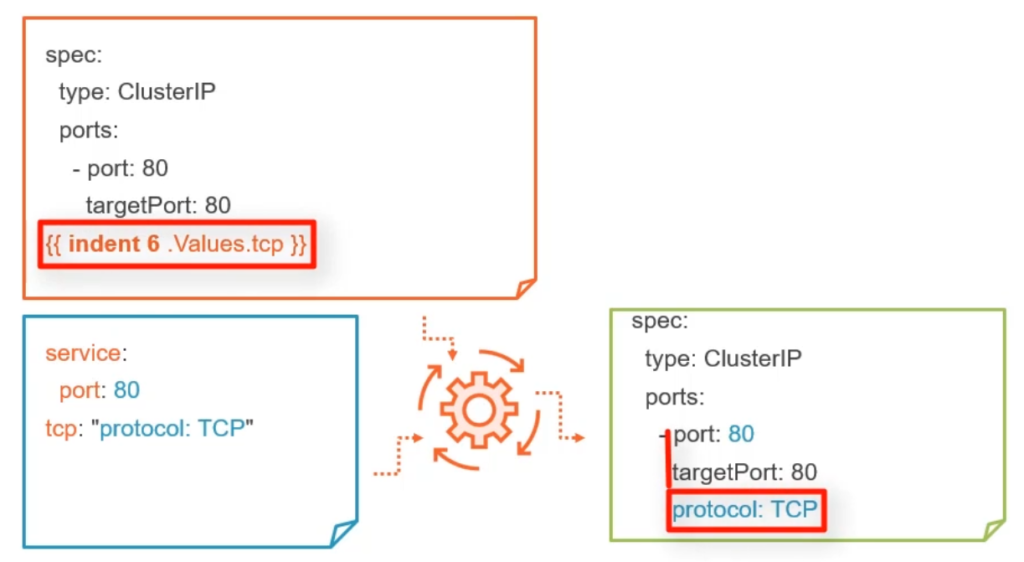
You can use indent function to align properties if normal indentation would not work:
Formatted output with printf
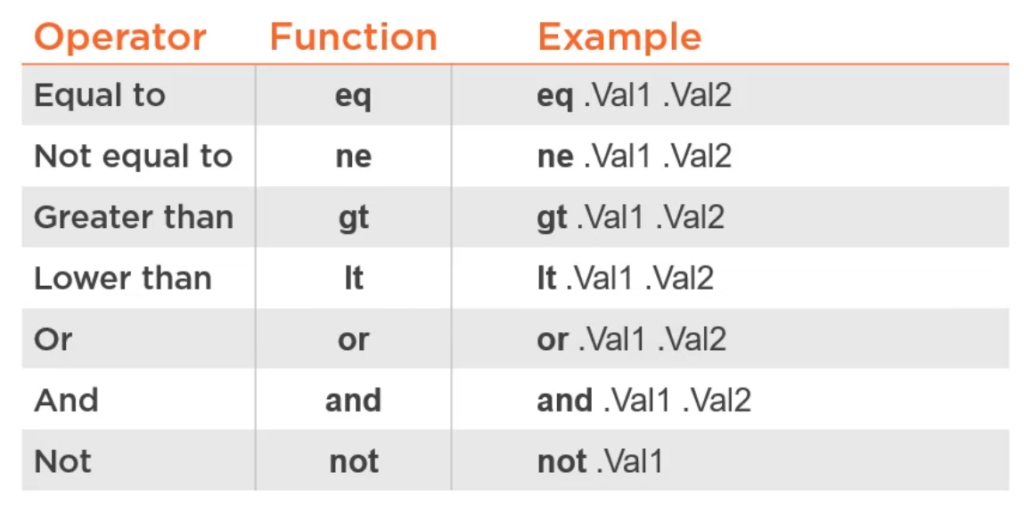
Logical operators are functions;
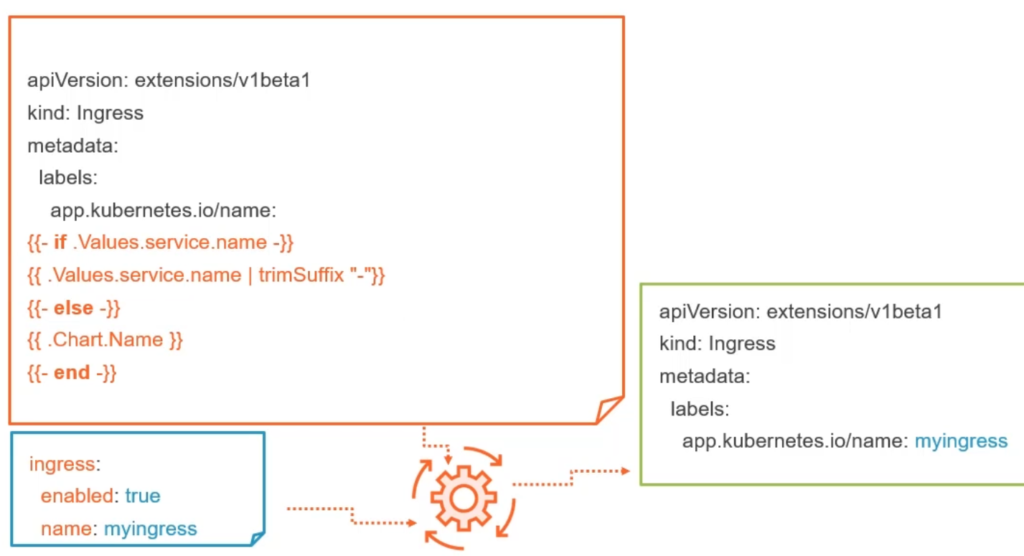
Conditions
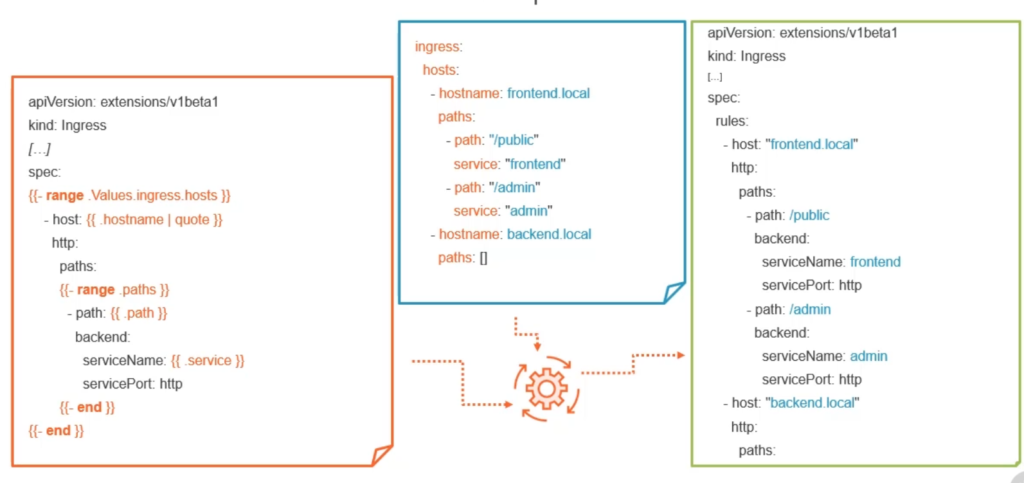
Loops
Variables
Because of scoping you can neither use hostname nor Release.Name:
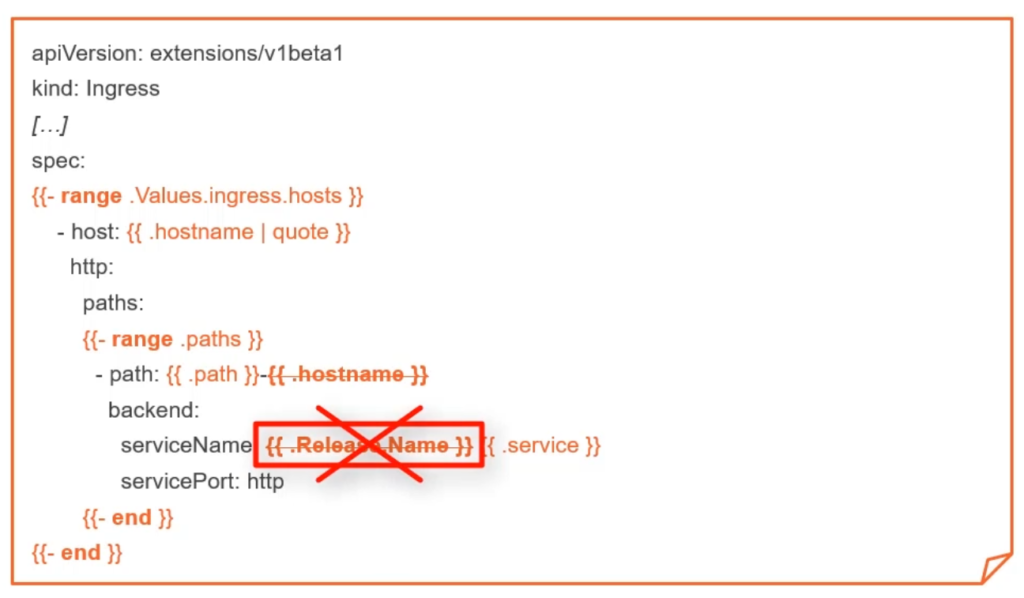
The solution is to define variables:
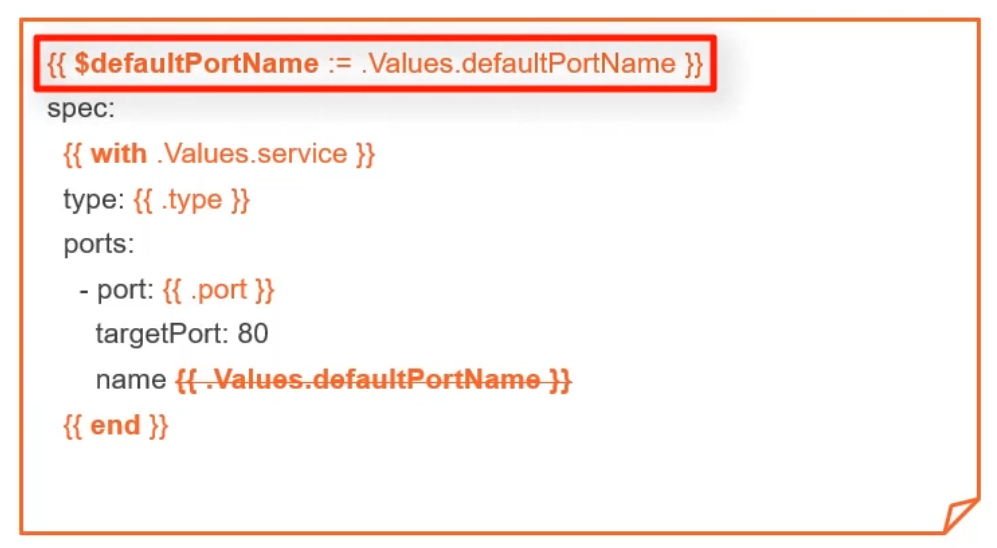
You can always access the root variables with $..
Helper functions
Also called sub templates or snippets. Define the with a unique name and reuse them anywhere in your chart:
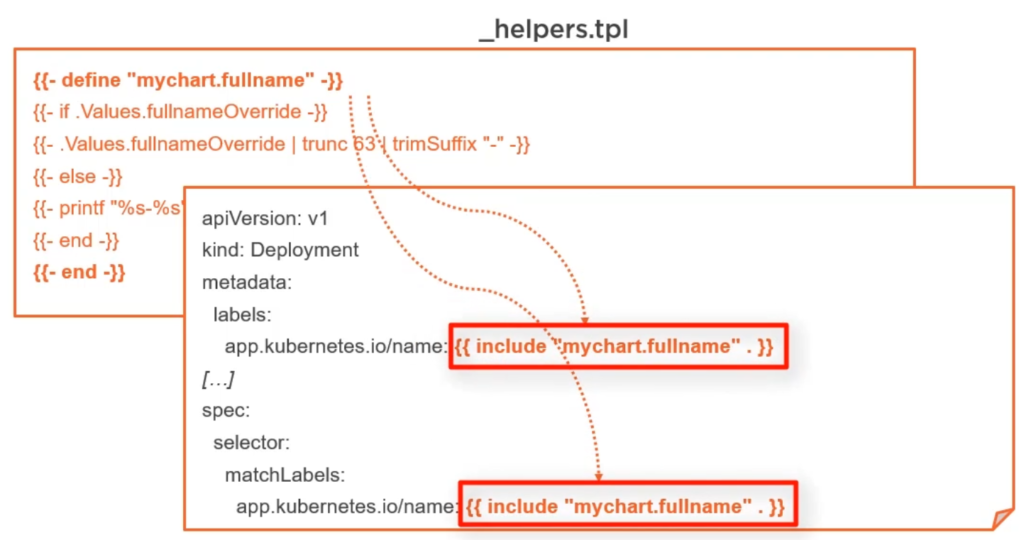
Store _helpers.tpl in your templates folder. File prefixed with underscore are not process by helm. Additionally you can create a .helmignore file and add files that shall be ignored, globbing is possible.
Packaging to a single file
You should create a single archive file before publishing your package on a Helm repository. Packages get gzipped to a single tar file, but you should not use the tar command, instead use helm package <chart>, this also adds the version number from Chart.yaml.
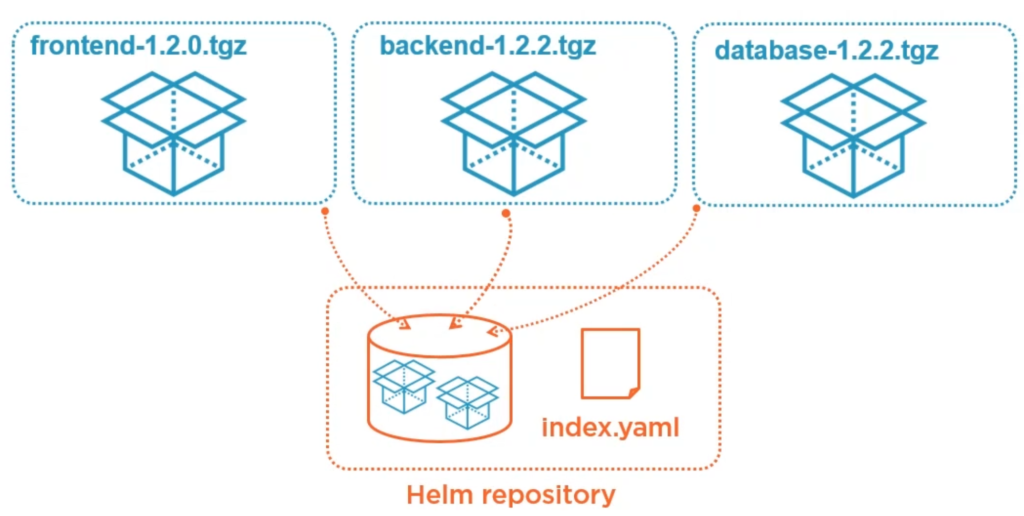
A Chart repository (not the Chart itself) has an index.yaml file which describe the containing Charts and can be dynamically created with helm repo index .. You can do that locally and then upload the repository to any web server. You can also digitally sign it:
# Sign with PGP key, verify and install trusted
helm package --sign
helm verify chart.tgz
helm install --verify
Helm repositories
How can you use a Chart from a repository? One way is to configure your helm client to use the repo. Helm can work with multiple repos at the same time.
# List repos
helm repo list

helm repo add myrepo http://myserver.bla

helm repo remove myrepo

# list available charts in repo
helm search repo myrepo
Defining dependencies
Let’s assume you have an empty Umbrella chart that is only containing Chart.yaml without dependency archive files. You would first specify your dependencies in Chart.yaml:
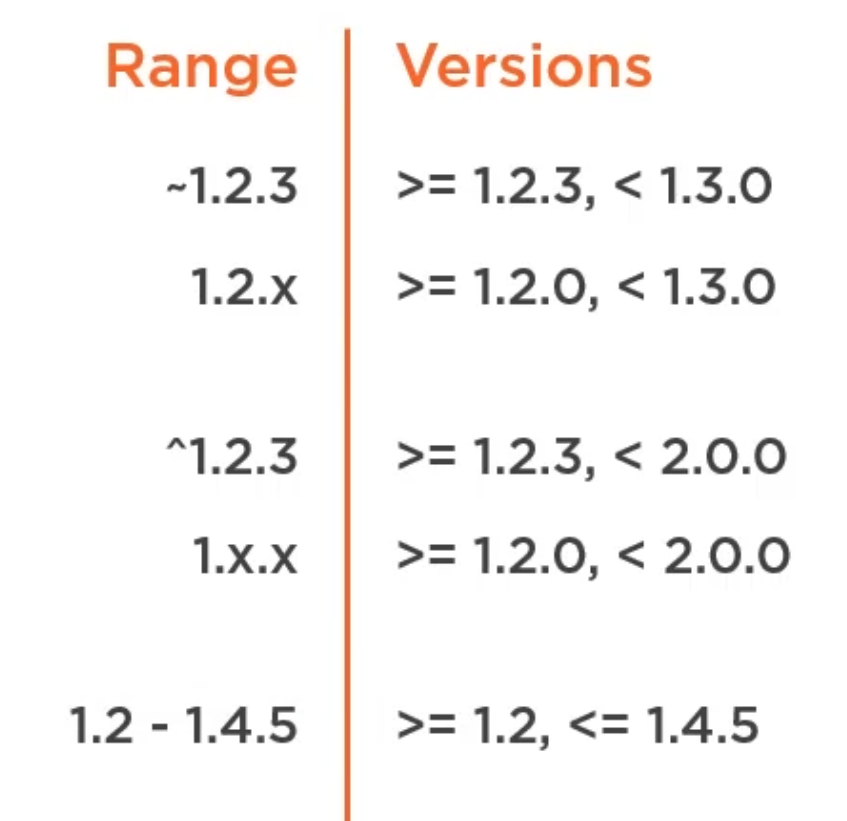
Short reminder about Semantic Versioning:
Now you download the dependencies from a repo (that you registered with helm earlier) with:
# Download or sync dependencies
helm dependency update my-umbrella-chart

helm dependency list my-umbrella-chart
Running helm dependency update <chart> creates a Chart.lock file, similar to a package.lock. file containing fixed dependency versions.json
If you need to stick with the same dependency versions (defined in Chart.lock) you run:
helm dependency build <chart>
Optional dependencies
You can mark dependencies as optional. This makes it possible to only install some dependencies only when required. You achieve this by using condition or tags. If you use both, then condition has priority.
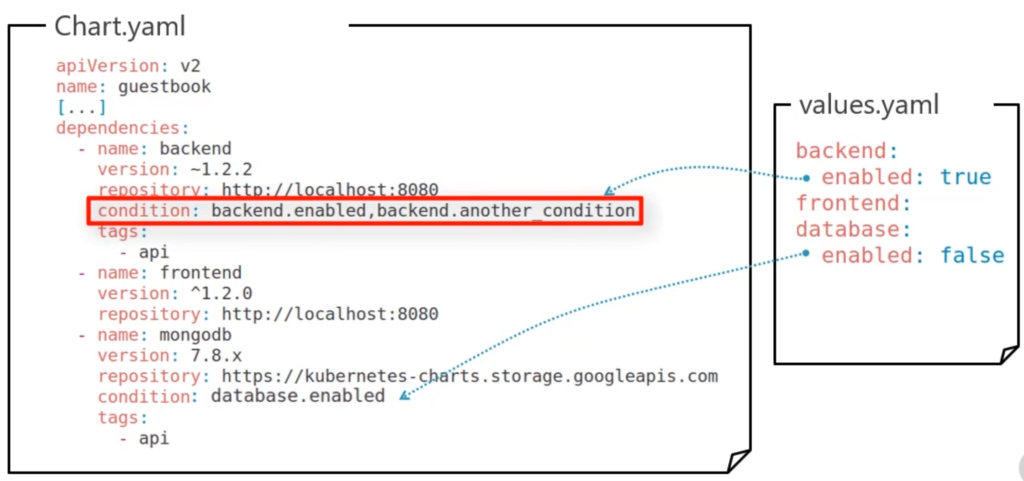
In this example only backend and frontend get installed, but not database.
Alternatively you could add tags object with api: true to values.yaml and remove all conditions from Chart.yaml. Now, only the dependencies tagged with api would be installed. Condition and tags are only evaluated during installation of packages not updating. You can also set properties on command line like: helm install demo mychart --set tags.api=false.
Using existing Helm Charts
Helm stable repositories are:
- https://hub.helm.sh
- https://github.com/helm/charts
- https://kubernetes-charts.storage.googleapis.com
helm repo list

helm search [hub|repo] keyword
helm inspect [all | readme | chart | values] <chart>
helm show values
helm fetch <chart>
helm dependency update <chart>
About Author

I am Mathias from Heidelberg, Germany. I am a passionate IT freelancer with 15+ years experience in programming, especially in developing web based applications for companies that range from small startups to the big players out there. I create Bosycom and initiated several software projects.