The word deployment is a bit overloaded with different meanings: A deployment is about getting your application code running on servers. In Kubernetes a Deployment is also the name of a resource or API object that deals with deployments. You will end up defining YAML-files that create these Deployment resources. k8syaml.com can assist you to create a deployment YAML file. First. let’s get an overview over how a deployment could work:
Deployment strategies
There are different deployment strategies:
- Rolling Update (Kubernetes default) gradually replaces old with new deployments
- Blue/Green Deployment (aka A/B deployment) is only accessible to testers or developers before it is going live for everyone
- Canary Deployment where only a small subset of users are receiving the new deployment
- Rollbacks to previous deployments
- Jobs and CronJobs to schedule tasks
In Kubernetes the smallest deployable unit is not a Container but a Pod. Pods are declaratively managed by a ReplicaSet. And a Deployment is a declarative way to manage Pods using a ReplicaSet. Deployments help you with self-healing, scaling, rolling updates and rollbacks. Again, you don’t have to specify a file for each ReplicaSet or Pod, because the Deployment object wraps them already:

You define a desired state, for example: “Always run two Pods of that docker image”. Kubernetes will then check if the current state matches the desired state.
The goal of any deployment is Zero-downtime deployment, meaning to allow software updates to be deployed to production without impacting end users with server downtime or errors.
Deployment commands
# Create initial deployment and record the command in the Deployment revision history (used for rollbacks)
kubectl create -f file.deployment.yml --save-config --record

# Apply existing deployment or create if it did not exist
kubectl apply -f deploy.yml

# Show active deployments (3 ways, working the same)
kubectl get deploy
kubectl get deployment
kubectl get deployments

# Show active deployment and their labels
kubectl get deploy  --show-labels

# Show active deployments with label 'app-nginx' (2 ways, working the same)
kubectl get deploy -l app=nginx
kubectl get deploy --selector app=nginx

# Show active deployments with label 'app-nginx and env=dev'
kubectl get deploy --selector app=nginx,env=dev

# Show active deployments with that do not have app=nginx
kubectl get deploy --selector app!=nginx

# Show active deployments with release 1.0 or 2.0
kubectl get deploy --selector 'release in (1.0,2.0)'

# Show active deployments not having release 1.0 or 2.0
kubectl get deploy --selector 'release notin (1.0,2.0)'

# Adding a label
kubectl label my-deployment app=foo --overwrite

# Removing a label
kubectl label my-deployment app-

# Delete deployments with specific label app=nginx
kubectl delete deplpy -l app=nginx
A rollout is obviously a deployment that has already been deployed. We can get info about it and even roll it back:
# Get info whether rollout was successful or not
kubectl rollout status deployment <deployment-name>

# Get rollout history of all revisions
kubectl rollout history deployment <deployment-name>

# Get rollout history of specific revision
kubectl rollout history deployment <deployment-name> --revision=2

# Rollback to previous revision (if previously deployed with --record)
kubectl rollout undo deployment <deployment-name>

# Rollback to a specific previous revision (if previously deployed with --record)
kubectl rollout undo deployment <deployment-name> --to-revision=2
You can use a command to scale your application:
# Scale deployment up/down to 5 replicas
kubectl scale deployment <deployment-name> --replicas=5
But it is is generally better to specify this declaratively in your deployment YAML file and apply the file.
You can port forward a deployment with kubectl port-forward deployment/<deployment-name> 8080:80 which is useful during development.
Rolling update
Rolling updates are the default, built-in deployment strategy in which Kubernetes gradually updates your Pods one by one instead of replacing them all at once. You can specify that a new Pod shall be deployed only after a few seconds after the previous one got deployed successfully. Also you can use probes (e.g. liveProbes and readinessProbes) to check if your new Pods are healthy. It is simply a matter of configuring your YAML file and applying it with kubectl:
apiVersion: v1
kind: Deployment
metadata:
  name: frontend
spec:
  replicas: 3
  minReadySeconds: 10           # seconds that the new Pod should be considered healthy (default 0)
  progressDeadlineSeconds: 60   # seconds to wait before reporting that deployment stalled (default 600)
  revisionHistoryLimit: 5       # number of replica sets that can be rolled back (default 10)
  strategy:
    type: RollingUpdate         # RollingUpdate is default
    rollingUpdate:
      maxSurge: 1               # Number of pods that can exceed the replicas count (default 25%) in this example: 3 replicas + 1 surge = 4 pods
      maxUnavailable: 0         # Number of pods that are not operational (default 25%)
Rollback to previous rollout
Use --record for your deployments to track revision. As mentioned before, Kubernetes is storing an old replica set instead of completely removing it once you deployed a new version. To roll back to the old version, first get revisions list: kubectl rollout history deploy <name>. Then kubectl rollout undo deploy <name> --to-revision=1.
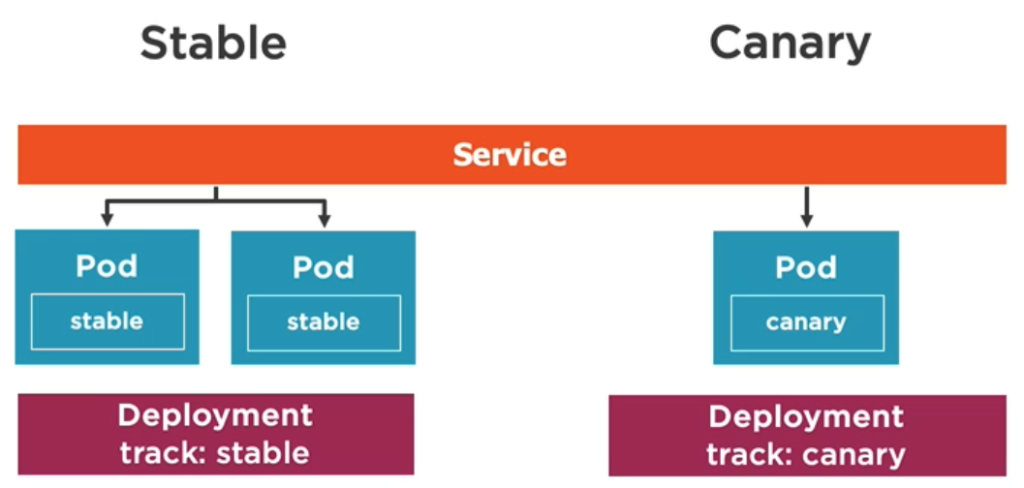
Canary deployments
Canary deployments are running two versions simultaneously, a stable and a rather experimental one. Only a small subset of users can see the experimental version while the majority of users still gets to see the stable version. Once you are confident the experimental version is working flawlessly, you can make it available to all users or otherwise reject it.
As a side note: The word canary is used, because canary birds were used in coal mines to warn miners early on about emerging toxic gas.
A canary deployment is like any other deployment, there is no special configuration property to create a canary deployment, instead you simply configure two deployments with different amounts of replicas. What ties them together is that service and both deployments use the same label.
In our example the stable deployment has 4 replicas (using image A), the canary deployment only 1 (using image B). A Service of type LoadBalancer will serve the deployment at a rate of 4 to 1. The important thing is that both deployments have the same label(s) defines as the Service.
apiVersion: v1
kind: Service
metadata:
  name: stable-service
  labels:
    app: my-app
spec:
  type: LoadBalancer
  selector:
    app: my-app
  ports:
    - port: 80
      targetPort: 80
---
# stable deployment
apiVersion: apps/v1
kind: Deployment
metadata:
  name: stable-deployment
spec:
  replicas: 4
  selector:
    matchLabels:
      app: my-app
      track: stable
  template:
    metadata:
      labels:
        app: my-app
        track: stable
    spec:
      containers:
        - name: stable-app
          image: stable-app
---
# canary deployment
apiVersion: apps/v1
kind: Deployment
metadata:
  name: stable-deployment
spec:
  replicas: 1
  selector:
    matchLabels:
      app: my-app
      track: canary
  template:
    metadata:
      labels:
        app: my-app
        track: canary
    spec:
      containers:
        - name: canary-app
          image: canary-app
Deploying this YAML is simply a matter of applying it with kubectl. If the canary version should be the new stable version, you increase the replicas, apply that deployment file and delete the old stable deployment.
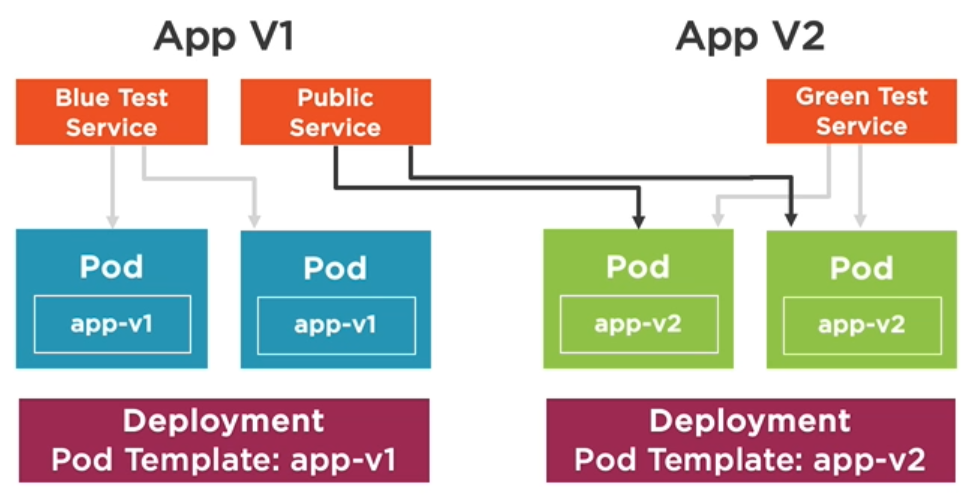
Blue/Green deployment
Similar to canary deployments with Blue-Green-deployments you end up having two versions rolled out and running simultaneously: Blue is the old existing deployment and Green is the new deployment. But there are important differences to canary deployments:
Difference 1: Hardware requirements: With Blue/Green deployment you are trying to mirror your existing deployment (blue) by creating a new deployment (green). The goal here is to get as close to a “live” system as we can get with our testing version. For that to happen both versions require two identical hardware environments that are configured exactly the same way. So, if blue is running four pods, then green should be running four pods. At this point you have to ask yourself if you have enough resources available. Remember that with canary deployments, we did not try to completely mirror an existing deployment, but instead only serve a small ReplicaSet to the users. That brings us to the next difference:
Difference 2: People that can see the new version: In Blue-Green deployment only you as the tester/developer gets to see the green version, while any other user (public traffic) still gets to see the blue version. Remember that with canary deployments everybody could see the new version, albeit with a reduced chance. Why would we want a separate “testing route” for us only? Because that way we can test the green version using a fully integrated system.
Once we are confident that the green version works, we make it available to everyone by routing traffic from blue to green.
That’s the concept, but how is that done in terms of configuration and Services? In canary deployments there is one service that acts as a load balancer and routes people to the stable and canary version. With Blue-Green-deployments there are separate services involved: A public service that routes users to the blue version and a Test service that only we know about: When we deploy our green version, we use a Green Test Service that is routing to the green version which – again – only we know about. Generally, we would have to use another port for the green version, because we cannot use the same port as the blue version.
Making the green version available for everyone is just a matter of having the Public service reroute to the green version. Once that is done the blue version can be removed, the green version becomes the new blue version.
Example deployment YAML file:
# public service (initially points to blue, later to green)
apiVersion: v1
kind: Service
metadata:
  name: public-service
  labels:
    app: my-app
    role: blue
    env: prod
spec:
  type: LoadBalancer
  selector:
    app: my-app
    role: blue
  ports:
    - port: 80         # our productive port
      targetPort: 80
---
# blue test service
apiVersion: v1
kind: Service
metadata:
  name: blue-test-service
  labels:
    app: my-app
    role: blue
    env: test
spec:
  type: LoadBalancer
  selector:
    role: blue
  ports:
    - port: 9000       # our test port
      targetPort: 80
---
# blue deployment
apiVersion: apps/v1
kind: Deployment
metadata:
  name: myapp-deployment-blue
spec:
  replicas: 2
  selector:
    matchLabels:
      app: my-app
      role: blue
  template:
    metadata:
      labels:
        app: my-app
        role: blue
    spec:
      containers:
        - name: myapp
          image: myapp-blue
          ports:
            - containerPort: 80
---
# green test service
apiVersion: v1
kind: Service
metadata:
  name: green-test-service
  labels:
    app: my-app
    track: green
spec:
  type: LoadBalancer
  selector:
    role: green
  ports:
    - port: 9000
      targetPort: 80
---
# green deployment
apiVersion: apps/v1
kind: Deployment
metadata:
  name: myapp-deployment-green
spec:
  replicas: 2
  selector:
    matchLabels:
      app: my-app
      role: green
  template:
    metadata:
      labels:
        app: my-app
        role: green
    spec:
      containers:
        - name: myapp
          image: myapp-green
          ports:
          - containerPort: 80
How would we change from blue to green? We have to change the selector of the public service from role: blue to role: green.
Two ways to do that: Update the YAML of the public service then apply the changes. Alternatively, run a command:
# set/change selector of a service
kubectl set selector svc <service-name> 'role=green'
Jobs and CronJobs
A Kubernetes Job is a one time thing. It creates one or more Pods that perform a task or batch process and once the job is done the Pods terminate and remain in state Completed, so you can check their logs even after they are done. The Pods get deleted when the Job gets deleted. Jobs do not run indefinitely as normal Pods would. They can run in parallel and successful completions are tracked.
# List jobs
kubectl get job
kubectl get jobs
apiVersion: batch/v1
kind: Job
metadata:
  name: counter
spec:
  completions: 4    # 4 pods must complete successfully (optional)
  parallelism: 2    # 2 Pods can run in parallel (optional) Allows to divide up work.
  activeDeadlineSeconds: 240   # how long the job can be active before it is terminated
  template:
    metadata:
      name: counter
    spec:
      restartPolicy: Never   # or OnFailure
      containers:
        - name: counter
          image: alpine
          command:
            - "sh"
            - "-c"
            - "echo 'something'"
Apply the file as usual.
CronJob
If you need to run a Job on a time-based schedule use a CronJob. CronJobs must be less than 52 characters.

0 * * * * run once every hour (or @hourly)
0 0 * * * run once every day at midnight (or @daily)
0 0 * * 0 run once every week (or @weekly)
0 0 1 * * run once every month (or @monthly)
0 0 1 1 * run once every year (or @yearly)
*/1 * * * * run once every minute
The website Crontab.guru helps you to create CronJob formats.
# List cronjobs
kubectl get cj
kubectl get cronjobs
apiVersion: batch/v1beta1
kind: CronJob
metadata:
  name: hello
spec:
  # concurrencyPolicy options are:
  # Allow: Allow multiple Pods to run event if their scheduling overlaps
  # Forbid: No concurrent jobs
  # Replace: Replace unfinished job with new one
  concurrencyPolicy: Allow
  schedule: "*/1 * * * *"
  jobTemplate:
    spec:
      template:
        spec:
          restartPolicy: OnFailure
          containers:
          - name: hello
            image: busybox
            imagePullPolicy: IfNotPresent
            args:
            - /bin/sh
            - -c
            - date; echo Hello from the Kubernetes cluster
Apply the file as usual.
Local deployments in Minikube
Let’s say you have a deployment.yaml in which you specified a local image (not from a repository) and you want to apply that file to your Minikube. But Minikube cannot handle the image, because it tries to download it from a repository. Here is how you can reference a local image in your deployment.yaml file:
# reuse the Docker daemon from Minikube
eval $(minikube docker-env)

# Build the image with the Docker daemon of Minikube
docker build -t my-image .
Set the image in the YAML file using the tag you chose when building it. Also set the imagePullPolicy to Never, otherwise Kubernetes will try to download the image:
    spec:
      containers:
        - name: my-image-container
          image: my-image
          imagePullPolicy: Never     # for local build in Minikube
Important note: You have to run eval $(minikube docker-env) on each terminal you want to use, since it only sets the environment variables for the current shell session.
About Author

I am Mathias from Heidelberg, Germany. I am a passionate IT freelancer with 15+ years experience in programming, especially in developing web based applications for companies that range from small startups to the big players out there. I create Bosycom and initiated several software projects.